(Created page with "{{Stub}} {{Infobox Province |name = {{PAGENAME}} |image = File:Che.png |caption = Che Guerrero |Province Owner = Che Guerrero |Scouting Cost = 100,000 |Scouting Time = ca. 22:...") Tag: sourceedit |
No edit summary |
||
| (15 intermediate revisions by 8 users not shown) | |||
| Line 1: | Line 1: | ||
| − | {{Stub}} |
||
{{Infobox Province |
{{Infobox Province |
||
| − | |name = {{PAGENAME}} |
+ | |name = The Province of {{PAGENAME}} |
|image = File:Che.png |
|image = File:Che.png |
||
|caption = Che Guerrero |
|caption = Che Guerrero |
||
|Province Owner = Che Guerrero |
|Province Owner = Che Guerrero |
||
|Scouting Cost = 100,000 |
|Scouting Cost = 100,000 |
||
| − | |Scouting Time = |
+ | |Scouting Time = 22:13:20 from the ship |
|Infiltration Cost = 15,000 |
|Infiltration Cost = 15,000 |
||
|Age = [[Postmodern Era]] |
|Age = [[Postmodern Era]] |
||
|Defense = +25% |
|Defense = +25% |
||
|Reward = [[File:MiB.png|20px|link=]] [[Medals|Postmodern Era PvP Tower]] |
|Reward = [[File:MiB.png|20px|link=]] [[Medals|Postmodern Era PvP Tower]] |
||
| + | }}Cai Chet Nui is one of the first two provinces (the other being [[Rung Chien Dau]]) of the Postmodern Era, located at the very end of the eastern peninsula. Taking over Cai Chet Nui unlocks [[Sot Dam Lay]] to the north. |
||
| + | The province owner, Che Guerrero, is based on the real-world rebel leader Che Guevara. |
||
| + | {{Narrative |
||
| ⚫ | |||
| + | |Content2=I know you are here to kill me. Shoot, coward, you are only defeating a man - not the revolution! |
||
| ⚫ | |||
}} |
}} |
||
| + | {{ProvinceMap |
||
| − | == Information == |
||
| + | |Map=Cai Chet Nui.png |
||
| + | |Sector1Army1= |
||
| ⚫ | |||
| ⚫ | |||
| + | |Sector1Army2= |
||
| + | *3 [[Armored Car]] |
||
| + | *3 [[Battle Tank]] |
||
| ⚫ | |||
| + | |Sector1Loot=7,500 {{ISUP}} |
||
| + | |Sector2Army1= |
||
| + | *3 [[Conscript]] |
||
| + | *1 [[Tank]] |
||
| ⚫ | |||
| + | |Sector2Army2= |
||
| + | *2 [[Conscript]] |
||
| + | *1 [[Tank]] |
||
| ⚫ | |||
| ⚫ | |||
| ⚫ | |||
| + | |Sector2Loot=7,500 {{ISUP}} |
||
| + | |Sector3Army1= |
||
| − | == Welcome Text == |
||
| + | *4 [[Tank]] |
||
| − | === First === |
||
| ⚫ | |||
| ⚫ | |||
| + | |Sector3Army2= |
||
| + | *3 [[Tank]] |
||
| ⚫ | |||
| ⚫ | |||
| + | |Sector3Loot=7,500 {{ISUP}} |
||
| + | |Sector4Army1= |
||
| − | === Second === |
||
| + | *2 [[Sniper]] |
||
| − | ''unknown text'' |
||
| + | *2 [[Conscript]] |
||
| + | *1 [[Bazooka Team]] |
||
| + | |Sector4Army2= |
||
| + | *2 [[Sniper]] |
||
| + | *1 [[Conscript]] |
||
| + | *1 [[Bazooka Team]] |
||
| ⚫ | |||
| ⚫ | |||
| + | |Sector4Loot=7,500 {{ISUP}} |
||
| + | |Sector5Army1= |
||
| − | === Attack === |
||
| + | *2 [[Rapid Fire Cannon]] |
||
| ⚫ | |||
| + | *1 [[Tank]] |
||
| + | *1 [[Armored Car]] |
||
| + | *1 [[Mechanized Infantry]] |
||
| + | |Sector5Army2= |
||
| + | *3 [[Rapid Fire Cannon]] |
||
| + | *1 [[Battle Tank]] |
||
| + | *2 [[Mechanized Infantry]] |
||
| ⚫ | |||
| + | |Sector5Loot=7,500 {{ISUP}} |
||
| + | |Sector6Army1= |
||
| − | == Map == |
||
| + | *4 [[Rapid Fire Cannon]] |
||
| − | [[File:Cai Chet Nui.png|600px|Cai Chet Nui]] |
||
| ⚫ | |||
| + | |Sector6Army2= |
||
| + | *3 [[Tank]] |
||
| + | *3 [[Mechanized Infantry]] |
||
| ⚫ | |||
| + | |Sector6Loot=7,500 {{ISUP}} |
||
| + | |Sector7Army1= |
||
| − | == Sectors == |
||
| + | *3 [[Sniper]] |
||
| − | {| class="article-table" |
||
| + | *1 [[Conscript]] |
||
| − | !Sector |
||
| + | *1 [[Mechanized Artillery]] |
||
| − | !1st Wave |
||
| + | |Sector7Army2= |
||
| − | Defending Army |
||
| + | *3 [[Sniper]] |
||
| − | !2nd Wave |
||
| + | *3 [[Bazooka Team]] |
||
| − | Defending Army |
||
| ⚫ | |||
| − | !Negotiation Cost |
||
| + | |Sector7Loot=7,500 {{ISUP}} |
||
| − | !Loot |
||
| ⚫ | |||
| − | |- |
||
| − | |1 |
||
| ⚫ | |||
| ⚫ | |||
| ⚫ | |||
| − | |7,500 {{Supplies}} |
||
| − | |- |
||
| − | |2 |
||
| ⚫ | |||
| − | |2 [[Conscript]]<br>1 [[Tank]]<br>2 [[Bazooka Team]]<br>1 [[Mechanized Artillery]] |
||
| ⚫ | |||
| − | |7,500 {{Supplies}} |
||
| − | |- |
||
| − | |3 |
||
| ⚫ | |||
| ⚫ | |||
| ⚫ | |||
| − | |7,500 {{Supplies}} |
||
| − | |- |
||
| − | |4 |
||
| − | |2 [[Sniper]]<br>2 [[Conscript]]<br>1 [[Bazooka Team]] |
||
| − | |2 [[Sniper]]<br>1 [[Conscript]]<br>1 [[Bazooka Team]]<br>2 [[Mechanized Infantry]] |
||
| ⚫ | |||
| − | |7,500 {{Supplies}} |
||
| − | |- |
||
| − | |5 |
||
| − | |2 [[Rapid Fire Cannon]]<br>1 [[Tank]]<br>1 [[Armored Car]]<br>1 [[Mechanized Infantry]] |
||
| − | |3 [[Rapid Fire Cannon]]<br>1 [[Battle Tank]]<br>2 [[Mechanized Infantry]] |
||
| ⚫ | |||
| − | |7,500 {{Supplies}} |
||
| − | |- |
||
| − | |6 |
||
| ⚫ | |||
| ⚫ | |||
| ⚫ | |||
| − | |7,500 {{Supplies}} |
||
| − | |- |
||
| − | |7 |
||
| ⚫ | |||
| ⚫ | |||
| ⚫ | |||
| − | |7,500 {{Supplies}} |
||
| − | |- |
||
| ⚫ | |||
| − | |||
| − | == Other Provinces == |
||
{{Provinces}} |
{{Provinces}} |
||
| + | [[de:Cai Chet Nui]] |
||
[[Category:Provinces]] |
[[Category:Provinces]] |
||
[[Category:Postmodern Era]] |
[[Category:Postmodern Era]] |
||
Revision as of 09:46, 6 June 2020
Cai Chet Nui is one of the first two provinces (the other being Rung Chien Dau) of the Postmodern Era, located at the very end of the eastern peninsula. Taking over Cai Chet Nui unlocks Sot Dam Lay to the north. The province owner, Che Guerrero, is based on the real-world rebel leader Che Guevara.
Narrative
If previous sectors acquired by negotiation:
| “ | TBA | „ |
If at least one sector taken by force:
| “ | TBA | „ |
Attack:
| “ | TBA | „ |
| Province Map | ||||
|---|---|---|---|---|
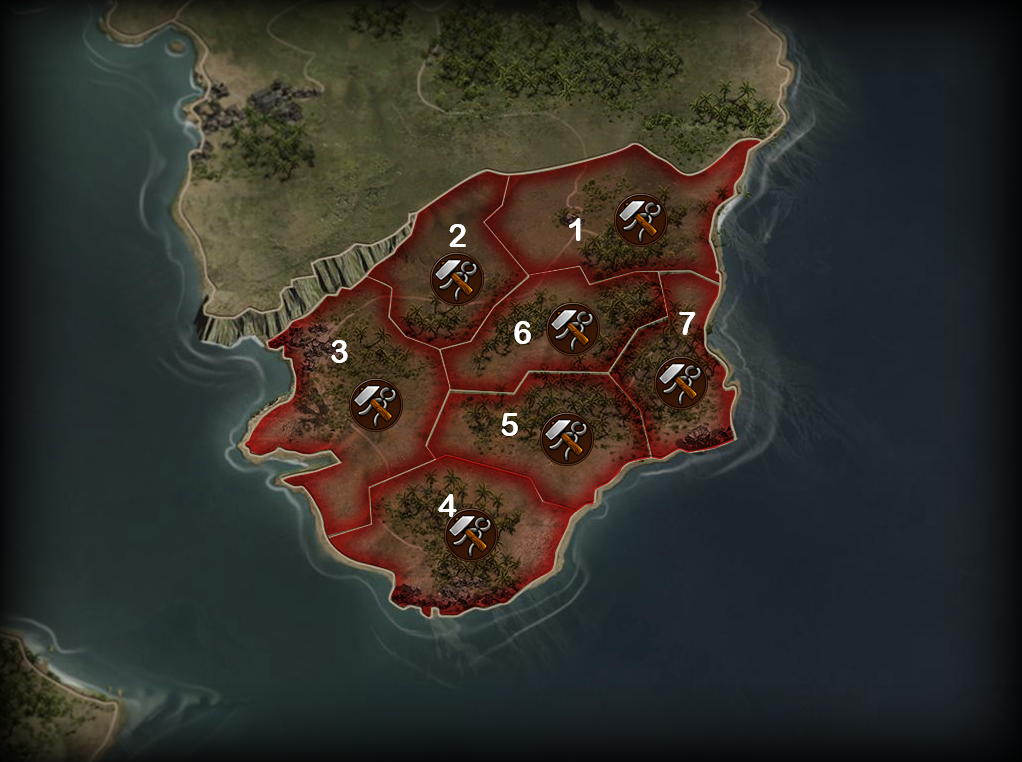 | ||||
| Sector | Wave | Defending Army Waves |
Negotiation Cost |
Loot |
| 1 | 1 | 7,500 | ||
| 2 | ||||
| 2 | 1 | 7,500 | ||
| 2 | ||||
| 3 | 1 | 7,500 | ||
| 2 | ||||
| 4 | 1 |
|
7,500 | |
| 2 | ||||
| 5 | 1 | 7,500 | ||
| 2 | ||||
| 6 | 1 | 7,500 | ||
| 2 | ||||
| 7 | 1 | 7,500 | ||
| 2 |
| |||