mNo edit summary |
m (Updating the scouting times to the default values) Tag: regular_user |
||
| (16 intermediate revisions by 6 users not shown) | |||
| Line 1: | Line 1: | ||
| − | {{Stub}} |
||
{{Infobox Province |
{{Infobox Province |
||
| − | |name |
+ | |name=The Province of Craggy Cay |
| − | |image |
+ | |image=File:Joan.png |
| − | |imagewidth |
+ | |imagewidth=90 |
| − | |caption |
+ | |caption=Joan Campbell |
| − | |Age |
+ | |Age=[[Oceanic Future]] |
| − | |Province Owner |
+ | |Province Owner=Joan Campbell |
| − | |Scouting Cost |
+ | |Scouting Cost=900,000 |
| − | |Scouting Time |
+ | |Scouting Time=1d 04:40 from [[Medusa Cove]] |
| − | |Infiltration Cost |
+ | |Infiltration Cost=220,000 |
| − | |Defense |
+ | |Defense=+45% (Wave 1), +40% (Wave 2) |
| − | |Reward |
+ | |Reward={{RPEA}} 30 {{RARS}} 30 {{RCOR}} 30 {{RBIL}} 30 {{RPLA}} 30 |
}} |
}} |
||
| ⚫ | |||
| ⚫ | |||
| − | == Information == |
||
| ⚫ | |||
| ⚫ | |||
| ⚫ | |||
| ⚫ | |||
| ⚫ | |||
| + | {{ProvinceMap |
||
| ⚫ | |||
| + | |Map=Craggy Cay.png |
||
| + | |Sector1Army1= |
||
| + | *4 [[Dragon Drone]] |
||
| + | *2 [[Surrogate Soldier]] |
||
| + | |Sector1Army2= |
||
| + | *1 [[Battle Fortress]] |
||
| + | *2 [[C.R.A.B. Mech]] |
||
| + | *1 [[Hydroelectric Eel]] |
||
| + | *1 [[Sub Cruiser]] |
||
| + | *1 [[Manta]] |
||
| + | |Sector1NegotiationCost={{RNAW}} 80 {{RAID}} 30<br/>{{RARS}} 60 {{RPRO}} 130 |
||
| ⚫ | |||
| + | |Sector2Army1= |
||
| − | '''If previous sectors acquired by negotiation:''' |
||
| + | *4 [[Dragon Drone]] |
||
| + | *2 [[Surrogate Soldier]] |
||
| + | |Sector2Army2= |
||
| + | *1 [[Battle Fortress]] |
||
| + | *2 [[C.R.A.B. Mech]] |
||
| + | *1 [[Hydroelectric Eel]] |
||
| + | *1 [[Sub Cruiser]] |
||
| + | *1 [[Manta]] |
||
| + | |Sector2NegotiationCost={{RPAB}} 80 {{RNAW}} 30<br/>{{RPLA}} 60 {{RCOR}} 40 |
||
| ⚫ | |||
| + | |Sector3Army1= |
||
| ⚫ | |||
| + | *2 [[Plasma Artillery]] |
||
| + | *2 [[Recon Raider]] |
||
| + | *2 [[Battle Fortress]] |
||
| + | |Sector3Army2= |
||
| + | *1 [[Battle Fortress]] |
||
| + | *2 [[Turturret]] |
||
| + | *1 [[Sub Cruiser]] |
||
| + | *1 [[C.R.A.B. Mech]] |
||
| + | *1 [[Manta]] |
||
| + | |Sector3NegotiationCost={{RTRG}} 80 {{RPAB}} 30<br/>{{RPEA}} 60 {{RPLA}} 40 |
||
| ⚫ | |||
| + | |Sector4Army1= |
||
| − | '''If at least one sector taken by force:''' |
||
| + | *2 [[Plasma Artillery]] |
||
| + | *2 [[Recon Raider]] |
||
| + | *2 [[Battle Fortress]] |
||
| + | |Sector4Army2= |
||
| + | *1 [[Battle Fortress]] |
||
| + | *2 [[Turturret]] |
||
| + | *1 [[Sub Cruiser]] |
||
| + | *1 [[C.R.A.B. Mech]] |
||
| + | *1 [[Manta]] |
||
| + | |Sector4NegotiationCost={{RAID}} 80 {{RORI}} 95<br/>{{RCOR}} 60 {{RBIL}} 40 |
||
| ⚫ | |||
| + | }} |
||
| ⚫ | |||
| ⚫ | |||
| + | [[de:Zerklüftetes Riff]] |
||
| − | '''Attack:''' |
||
| − | |||
| ⚫ | |||
| − | |||
| − | == Map == |
||
| − | {| class="article-table" style="width: 100%; text-align:center; background-color: #0E0000;" border="0" |
||
| − | |- |
||
| − | | colspan="6" style="background-color: #800000;" |'''Province Map''' |
||
| − | |- |
||
| − | | colspan="6" style="background-color: #1C0000;" |[[File:{{PAGENAME}}.png|600px|{{PAGENAME}}]] |
||
| − | |- |
||
| − | | style="background-color: #800000; width:10%;" |'''Sector''' |
||
| − | | style="background-color: #800000; width:55%;" |'''Defending Army''' |
||
| − | | style="background-color: #800000; width:20%;" |'''Negotiation<br />Cost''' |
||
| − | | style="background-color: #800000; width:15%;" |'''Loot''' |
||
| − | |- |
||
| − | | rowspan="2" style="background-color: #1C0000;" |'''1''' |
||
| − | |'''1.''' {{AFH1}} {{AFH1}} {{AFH1}} {{OFL1}} {{OFL1}} {{OFA1}} {{UNXX}} |
||
| − | | rowspan="2" |{{RNAW}} 65 {{RPEA}} 90<br/>{{RCOR}} 90 |
||
| ⚫ | |||
| − | |- |
||
| − | |'''2.''' {{OFL1}} {{OFL1}} {{OFH1}} {{OFH1}} {{OFH1}} {{OFR2}} {{OFR2}} |
||
| − | |- |
||
| − | | rowspan="2" style="background-color: #1C0000;" |'''2''' |
||
| − | |'''1.''' {{AFH1}} {{AFH1}} {{AFH1}} {{OFL1}} {{OFL1}} {{OFA1}} {{UNXX}} |
||
| − | | rowspan="2" |{{RPRO}} 100 {{RBIL}} 90<br/>{{RPEA}} 90 |
||
| ⚫ | |||
| − | |- |
||
| − | |'''2.''' {{OFL1}} {{OFL1}} {{OFH1}} {{OFH1}} {{OFH1}} {{OFR2}} {{OFR2}} |
||
| − | |- |
||
| − | | rowspan="2" style="background-color: #1C0000;" |'''3''' |
||
| − | |'''1.''' {{AFLU}} {{AFLU}} {{AFLU}} {{OFL1}} {{OFL1}} {{OFF1}} {{UNXX}} |
||
| − | | rowspan="2" |{{RPAB}} 65 {{RORI}} 120<br/>{{RBIL}} 90 |
||
| ⚫ | |||
| − | |- |
||
| − | |'''2.''' {{OFA1}} {{OFA1}} {{OFA1}} {{OFR1}} {{OFR1}} {{OFR2}} {{OFR2}} |
||
| − | |- |
||
| − | | rowspan="2" style="background-color: #1C0000;" |'''4''' |
||
| − | |'''1.''' {{AFH1}} {{AFH1}} {{AFH1}} {{OFL1}} {{OFL1}} {{OFA1}} {{UNXX}} |
||
| − | | rowspan="2" |{{RBIP}} 65 {{RPLA}} 90<br/>{{RORI}} 125 |
||
| ⚫ | |||
| − | |- |
||
| − | |'''2.''' {{OFL1}} {{OFL1}} {{OFH1}} {{OFH1}} {{OFH1}} {{OFR2}} {{OFR2}} |
||
| ⚫ | |||
| − | |||
| − | == Other Provinces == |
||
| ⚫ | |||
| − | [[de:Zerklüftetes_Riff]] |
||
[[Category:Provinces]] |
[[Category:Provinces]] |
||
[[Category:Oceanic Future]] |
[[Category:Oceanic Future]] |
||
| + | [[Category:Oceanic Future Provinces]] |
||
Latest revision as of 20:38, 2 October 2022
Craggy Cay is the 60th province (Stage 4 Province 7) of the Oceanic Future, accessible after taking control of Medusa Cove to the west. Taking over Craggy Cay unlocks Buccaneer Plateau to the southeast.
Narrative[]
If previous sectors acquired by negotiation:
| “ | We're on our way to Ryan's group. Care to join? | „ |
If at least one sector taken by force:
| “ | We're on our way to Ryan's group. Care to join? | „ |
Attack:
| “ | What are you doing? Are you on his side? | „ |
| Province Map | ||||
|---|---|---|---|---|
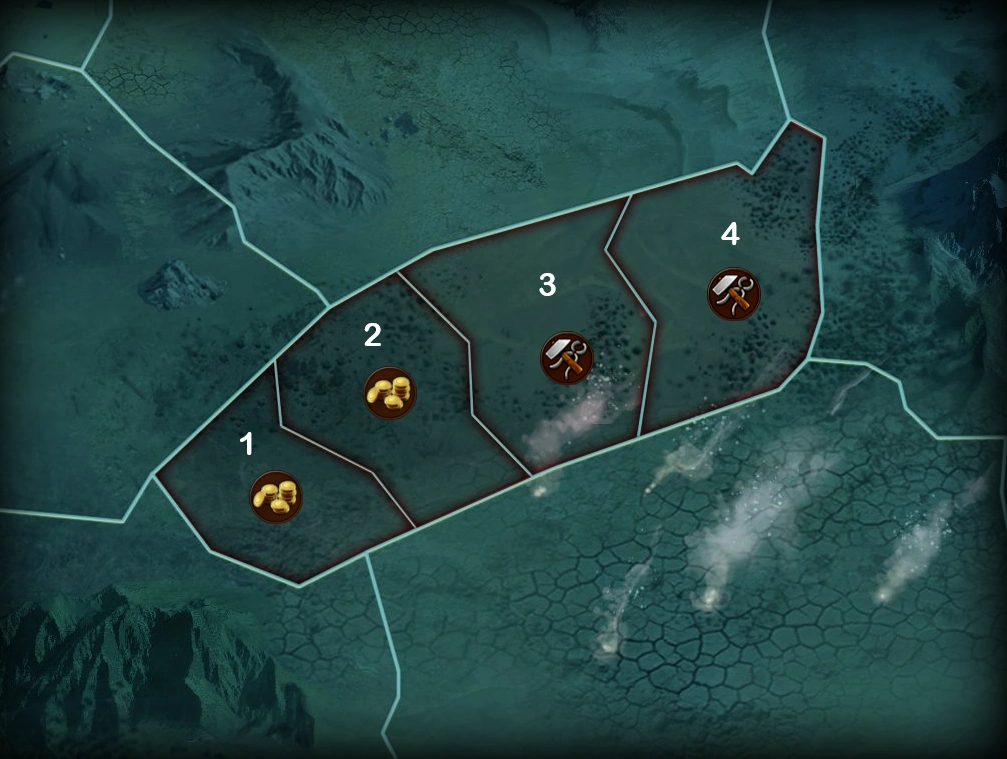 | ||||
| Sector | Wave | Defending Army Waves |
Negotiation Cost |
Loot |
| 1 | 1 | |||
| 2 | ||||
| 2 | 1 | |||
| 2 | ||||
| 3 | 1 | |||
| 2 |
| |||
| 4 | 1 | |||
| 2 |
| |||