m (→Quests) |
mNo edit summary |
||
| (39 intermediate revisions by 3 users not shown) | |||
| Line 1: | Line 1: | ||
| ⚫ | |||
| − | {{unreleased}} |
||
| − | {{WorkInProgress|Beelzebob6666}} |
||
| ⚫ | |||
| − | <center>''Arising from the Sengoku period of Feudal Japan, the clan of '''Akechi Mitsuhide''' has requested your help.<br />As the Daimyo of his village, it is your task to lead |
+ | <center>''Arising from the Sengoku period of Feudal Japan, the clan of '''Akechi Mitsuhide''' has requested your help.<br />As the Daimyo of his village, it is your task to lead Feudal Japan to prosperity!''</center> |
<br /> |
<br /> |
||
== Introduction == |
== Introduction == |
||
| − | + | '''{{PAGENAME}}''' is the second culture of the [[Cultural settlements]], introduced to the game on July 10, 2019. Construct [[Feudal Japan Settlement]] buildings and gain their resources to unlock [[#Embassy Advancements|embassy advancements]]. Finish the settlement by completing all quests to gain unique [[#Settlement Rewards|settlement rewards]]. |
|
| − | This page explains the workings of the quests, embassy advancements and rewards, for information about the settlement and it's buildings check the [[ |
+ | This page explains the workings of the quests, embassy advancements and rewards, for information about the settlement and it's buildings check the [[Feudal Japan Settlement]] page. |
== Milestone Rewards == |
== Milestone Rewards == |
||
| Line 21: | Line 19: | ||
== Quests == |
== Quests == |
||
| − | [[File: |
+ | [[File:Mitsuhide_LowRes.png|right|thumb|Akechi Mitsuhide]] |
| − | Finish all 17 quests presented by '''Akechi Mitsuhide''' to finish the [[ |
+ | Finish all 17 quests presented by '''Akechi Mitsuhide''' to finish the [[Feudal Japan Settlement]]. The quest rewards consist of items for the player's main city, like [[coins]], [[supplies]], [[Forge Point]]s and [[Self-Aid Kit]]s. |
| − | <u>'''Quest 1'''</u> |
||
{{Event Quest|Number=1|QuestGiver=Akechi Mitsuhide|Color=#FF7F50|RewardColor=#FFB6C1 |
{{Event Quest|Number=1|QuestGiver=Akechi Mitsuhide|Color=#FF7F50|RewardColor=#FFB6C1 |
||
| + | |Condition1=Have 3 [[Feudal Japan Settlement#Residential Buildings|Gasshō-zukuri Hut]] |
||
| − | |Condition1= |
||
|Or1= |
|Or1= |
||
| − | |Reward=}} |
+ | |Reward={{ICOI}} Small [[coins]] package}} |
{{Event Quest|Number=2|QuestGiver=Akechi Mitsuhide|Color=#FF7F50|RewardColor=#FFB6C1 |
{{Event Quest|Number=2|QuestGiver=Akechi Mitsuhide|Color=#FF7F50|RewardColor=#FFB6C1 |
||
| + | |Condition1=Have 5 [[Feudal Japan Settlement#Diplomacy Buildings|Tōrō]] |
||
| − | |Condition1= |
||
|Or1= |
|Or1= |
||
| + | |Reward=[[File:Motivation kit.png||30px]] [[Self-Aid Kit]]}} |
||
| − | |Reward=}} |
||
{{Event Quest|Number=3|QuestGiver=Akechi Mitsuhide|Color=#FF7F50|RewardColor=#FFB6C1 |
{{Event Quest|Number=3|QuestGiver=Akechi Mitsuhide|Color=#FF7F50|RewardColor=#FFB6C1 |
||
| + | |Condition1=Have 1 [[Feudal Japan Settlement#Diplomacy Buildings|Soy Bean Field]] |
||
| − | |Condition1= |
||
|Or1= |
|Or1= |
||
| − | |Reward=}} |
+ | |Reward={{ISUP}} Small [[supplies]] package}} |
{{Event Quest|Number=4|QuestGiver=Akechi Mitsuhide|Color=#FF7F50|RewardColor=#FFB6C1 |
{{Event Quest|Number=4|QuestGiver=Akechi Mitsuhide|Color=#FF7F50|RewardColor=#FFB6C1 |
||
| − | |Condition1=Have |
+ | |Condition1=Have 45 diplomacy |
| − | |Or1= |
+ | |Or1=Gather 10 Soy |
| − | |Reward= |
+ | |Reward={{ICOI}} Small [[coins]] package}} |
{{Event Quest|Number=5|QuestGiver=Akechi Mitsuhide|Color=#FF7F50|RewardColor=#FFB6C1 |
{{Event Quest|Number=5|QuestGiver=Akechi Mitsuhide|Color=#FF7F50|RewardColor=#FFB6C1 |
||
| + | |Condition1=Have 1 [[Feudal Japan Settlement#Diplomacy Buildings|Shinto Shrine]] |
||
| − | |Condition1= |
||
|Or1= |
|Or1= |
||
| + | |Reward=[[File:Motivation kit.png||30px]] [[Self-Aid Kit]]}} |
||
| − | |Reward=}} |
||
{{Event Quest|Number=6|QuestGiver=Akechi Mitsuhide|Color=#FF7F50|RewardColor=#FFB6C1 |
{{Event Quest|Number=6|QuestGiver=Akechi Mitsuhide|Color=#FF7F50|RewardColor=#FFB6C1 |
||
| + | |Condition1=Have 1 [[Feudal Japan Settlement#Cultural Goods Buildings|Gallery]] |
||
| − | |Condition1= |
||
|Or1= |
|Or1= |
||
| − | |Reward=}} |
+ | |Reward={{FP}} 5}} |
{{Event Quest|Number=7|QuestGiver=Akechi Mitsuhide|Color=#FF7F50|RewardColor=#FFB6C1 |
{{Event Quest|Number=7|QuestGiver=Akechi Mitsuhide|Color=#FF7F50|RewardColor=#FFB6C1 |
||
| − | |Condition1= |
+ | |Condition1=Gather 10 Paintings |
|Or1= |
|Or1= |
||
| − | |Reward=}} |
+ | |Reward={{ICOI}} Small [[coins]] package}} |
{{Event Quest|Number=8|QuestGiver=Akechi Mitsuhide|Color=#FF7F50|RewardColor=#FFB6C1 |
{{Event Quest|Number=8|QuestGiver=Akechi Mitsuhide|Color=#FF7F50|RewardColor=#FFB6C1 |
||
| − | |Condition1= |
+ | |Condition1=Have 100 diplomacy |
| − | |Or1= |
+ | |Or1=Gather 20 Paintings |
| + | |Reward=[[File:Motivation kit.png||30px]] [[Self-Aid Kit]]}} |
||
| − | |Reward=}} |
||
{{Event Quest|Number=9|QuestGiver=Akechi Mitsuhide|Color=#FF7F50|RewardColor=#FFB6C1 |
{{Event Quest|Number=9|QuestGiver=Akechi Mitsuhide|Color=#FF7F50|RewardColor=#FFB6C1 |
||
| − | |Condition1=Have 1 [[ |
+ | |Condition1=Have 1 [[Feudal Japan Settlement#Cultural Goods Buildings|Armorer]] |
|Or1= |
|Or1= |
||
|Reward={{ICOI}} Small [[coins]] package}} |
|Reward={{ICOI}} Small [[coins]] package}} |
||
{{Event Quest|Number=10|QuestGiver=Akechi Mitsuhide|Color=#FF7F50|RewardColor=#FFB6C1 |
{{Event Quest|Number=10|QuestGiver=Akechi Mitsuhide|Color=#FF7F50|RewardColor=#FFB6C1 |
||
| + | |Condition1=Have 2 [[Feudal Japan Settlement#Diplomacy Buildings|Decorated Torii Gate]] |
||
| − | |Condition1= |
||
| + | |Or1=Have 2 [[Feudal Japan Settlement#Diplomacy Buildings|Sacred Torii Gate]] |
||
| − | |Or1= |
||
| − | |Reward=}} |
+ | |Reward={{ISUP}} Small [[supplies]] package}} |
{{Event Quest|Number=11|QuestGiver=Akechi Mitsuhide|Color=#FF7F50|RewardColor=#FFB6C1 |
{{Event Quest|Number=11|QuestGiver=Akechi Mitsuhide|Color=#FF7F50|RewardColor=#FFB6C1 |
||
| − | |Condition1= |
+ | |Condition1=Have 325 Diplomacy |
|Or1= |
|Or1= |
||
| − | |Reward=}} |
+ | |Reward={{ICOI}} Small [[coins]] package}} |
{{Event Quest|Number=12|QuestGiver=Akechi Mitsuhide|Color=#FF7F50|RewardColor=#FFB6C1 |
{{Event Quest|Number=12|QuestGiver=Akechi Mitsuhide|Color=#FF7F50|RewardColor=#FFB6C1 |
||
| + | |Condition1=Have 1 [[Feudal Japan Settlement#Cultural Goods Buildings|Instrument Workshop]] |
||
| − | |Condition1= |
||
|Or1= |
|Or1= |
||
| − | |Reward=}} |
+ | |Reward={{FP}} 5}} |
{{Event Quest|Number=13|QuestGiver=Akechi Mitsuhide|Color=#FF7F50|RewardColor=#FFB6C1 |
{{Event Quest|Number=13|QuestGiver=Akechi Mitsuhide|Color=#FF7F50|RewardColor=#FFB6C1 |
||
| + | |Condition1=Have 2 [[Feudal Japan Settlement#Residential Buildings|Shinden-Zukuri Manors]] |
||
| − | |Condition1= |
||
|Or1= |
|Or1= |
||
| + | |Reward=[[File:Motivation kit.png||30px]] [[Self-Aid Kit]]}} |
||
| − | |Reward=}} |
||
{{Event Quest|Number=14|QuestGiver=Akechi Mitsuhide|Color=#FF7F50|RewardColor=#FFB6C1 |
{{Event Quest|Number=14|QuestGiver=Akechi Mitsuhide|Color=#FF7F50|RewardColor=#FFB6C1 |
||
| − | |Condition1= |
+ | |Condition1=Have 525 diplomacy |
| + | |Or1=Gather 30 Instruments |
||
| − | |Or1= |
||
| − | |Reward=}} |
+ | |Reward={{ICOI}} Small [[coins]] package}} |
{{Event Quest|Number=15|QuestGiver=Akechi Mitsuhide|Color=#FF7F50|RewardColor=#FFB6C1 |
{{Event Quest|Number=15|QuestGiver=Akechi Mitsuhide|Color=#FF7F50|RewardColor=#FFB6C1 |
||
| + | |Condition1=Have 2 [[Feudal Japan Settlement#Diplomacy Buildings|Zen Gardens]] |
||
| − | |Condition1= |
||
|Or1= |
|Or1= |
||
| − | |Reward=}} |
+ | |Reward={{ISUP}} Small [[supplies]] package}} |
{{Event Quest|Number=16|QuestGiver=Akechi Mitsuhide|Color=#FF7F50|RewardColor=#FFB6C1 |
{{Event Quest|Number=16|QuestGiver=Akechi Mitsuhide|Color=#FF7F50|RewardColor=#FFB6C1 |
||
| + | |Condition1=Have 1 [[Feudal Japan Settlement#Diplomacy Buildings|Dojo]] |
||
| − | |Condition1= |
||
|Or1= |
|Or1= |
||
| + | |Reward=[[File:Motivation kit.png||30px]] [[Self-Aid Kit]]}} |
||
| − | |Reward=}} |
||
{{Event Quest|Number=17|QuestGiver=Akechi Mitsuhide|Color=#FF7F50|RewardColor=#FFB6C1 |
{{Event Quest|Number=17|QuestGiver=Akechi Mitsuhide|Color=#FF7F50|RewardColor=#FFB6C1 |
||
| + | |Condition1=Gather {{Koban Coins}} 2000 Koban Coins and {{CuGB}} 10 each of every cultural good |
||
| − | |Condition1= |
||
|Or1= |
|Or1= |
||
| − | |Reward=}} |
+ | |Reward={{ICOI}} Small [[coins]] package}} |
== Embassy Advancements == |
== Embassy Advancements == |
||
=== Cultural Goods and Diplomacy === |
=== Cultural Goods and Diplomacy === |
||
| − | Embassy Advancements have to be unlocked in order to build new settlement buildings and to be able to unlock the next advancement. Embassy Advancements can be unlocked by paying a certain amount of [[ |
+ | Embassy Advancements have to be unlocked in order to build new settlement buildings and to be able to unlock the next advancement. Embassy Advancements can be unlocked by paying a certain amount of [[Feudal Japan Settlement#Cultural Goods Buildings|cultural goods]], while having the requested amount of [[Feudal Japan Settlement#Diplomacy Buildings|diplomacy]]. '''Although the total amount of cultural goods and the type of goods is the same for every player, the amount of each good can be different.'''<br /><br /> |
[[File:Japanese_Embassy_Screen.png|center|500px|Embassy Advancements window]]<br /> |
[[File:Japanese_Embassy_Screen.png|center|500px|Embassy Advancements window]]<br /> |
||
| − | The table below shows the '''total amount''' of cultural goods and the '''possible''' type of goods needed for each advancement. It can happen that one of the possible goods requires 0 amount and is not shown to the player. The total amount of cultural goods needed to unlock all advancements is |
+ | The table below shows the '''total amount''' of cultural goods and the '''possible''' type of goods needed for each advancement. It can happen that one of the possible goods requires 0 amount and is not shown to the player. The total amount of cultural goods needed to unlock all advancements is 895. |
=== Using Diamonds === |
=== Using Diamonds === |
||
| Line 122: | Line 119: | ||
Example: the first advancement costs {{Soy}} 10 soy and requires {{Diplomacy}} 45 diplomacy, the total diamond cost will be 10*5 + 45 = {{IDIA}} 95 diamonds. A player has {{Soy}} 5 soy in stock and {{Diplomacy}} 40 diplomacy in their city, missing {{Soy}} 5 soy and {{Diplomacy}} 5 diplomacy. This will cost 5*5 + 5 = {{IDIA}} 30 diamonds to unlock the advancement, '''plus''' the {{Soy}} 5 soy in stock.<br /> |
Example: the first advancement costs {{Soy}} 10 soy and requires {{Diplomacy}} 45 diplomacy, the total diamond cost will be 10*5 + 45 = {{IDIA}} 95 diamonds. A player has {{Soy}} 5 soy in stock and {{Diplomacy}} 40 diplomacy in their city, missing {{Soy}} 5 soy and {{Diplomacy}} 5 diplomacy. This will cost 5*5 + 5 = {{IDIA}} 30 diamonds to unlock the advancement, '''plus''' the {{Soy}} 5 soy in stock.<br /> |
||
| − | The amount of diamonds shown below is the maximum diamond cost for each advancement, when no goods or diplomacy would be used at all. The total cost of all advancements would then be {{IDIA}} |
+ | The amount of diamonds shown below is the maximum diamond cost for each advancement, when no goods or diplomacy would be used at all. The total cost of all advancements would then be {{IDIA}} 6,935. |
'''Warning''': before using [[diamonds]], be aware that when finishing a settlement (or abandoning one), the settlement will be reset and '''all buildings, goods in stock, advancements and expansions''' will be lost, including those unlocked with diamonds. |
'''Warning''': before using [[diamonds]], be aware that when finishing a settlement (or abandoning one), the settlement will be reset and '''all buildings, goods in stock, advancements and expansions''' will be lost, including those unlocked with diamonds. |
||
| − | {| class=" |
+ | {| class="FoETable" |
! style="width:250px" |Advancement |
! style="width:250px" |Advancement |
||
| − | ! style="width:150px |
+ | ! style="width:150px" |{{CuGB}} Costs to unlock |
| − | ! style="width:175px |
+ | ! style="width:175px" |{{Diplomacy}} Diplomacy needed |
|- |
|- |
||
| − | | |
+ | | [[File:J_SS_Japanese_Diplomacy5.png|80px|Shinto Shrine]]<br />[[Feudal Japan Settlement#Diplomacy Buildings|Shinto Shrine]] |
| − | | |
+ | | {{Soy}}<br />10 total<br />({{IDIA}} 95) |
| − | | |
+ | | {{Diplomacy}}<br />45 |
|- |
|- |
||
| − | | |
+ | | [[File:Japanese_CulturalGoodsProduction_Paintings.png|80px|Gallery]]<br />[[Feudal Japan Settlement#Cultural Goods Buildings|Gallery]] |
| − | | |
+ | | {{Soy}}<br />35 total<br />({{IDIA}} 275) |
| − | | |
+ | | {{Diplomacy}}<br />100 |
|- |
|- |
||
| − | | |
+ | | [[File:Japanese_CulturalGoodsProduction_Armor.png|80px|Armorer]] <br />[[Feudal Japan Settlement#Cultural Goods Buildings|Armorer]] |
| − | | |
+ | | rowspan="2"|{{Soy}} + {{Paintings}}<br />75 total<br />({{IDIA}} 540) |
| − | | |
+ | | rowspan="2"|{{Diplomacy}}<br />165 |
|- |
|- |
||
| − | | |
+ | | [[File:R_SS_Japanese_Residential2.png|80px|Shoin-zukuri House]]<br />[[Feudal Japan Settlement#Residential Buildings|Shoin-zukuri House]] |
|- |
|- |
||
| − | | |
+ | | [[File:J_SS_Japanese_Diplomacy2.png|80px|Decorated Torii Gate]] <br />[[Feudal Japan Settlement#Diplomacy Buildings|Decorated Torii Gate]] |
| − | | |
+ | | rowspan="2"|{{Soy}} + {{Paintings}} + {{Armor}}<br />105 total<br />({{IDIA}} 765) |
| − | | |
+ | | rowspan="2"|{{Diplomacy}}<br />240 |
|- |
|- |
||
| − | | |
+ | | [[File:J_SS_Japanese_Diplomacy3.png|80px|Shoin-zukuri House]]<br />[[Feudal Japan Settlement#Diplomacy Buildings|Sacred Torii Gate]] |
|- |
|- |
||
| − | | |
+ | | [[File:Japanese_CulturalGoodsProduction_Instruments.png|80px|Instrument Workshop]]<br />[[Feudal Japan Settlement#Cultural Goods Buildings|Instrument Workshop]] |
| − | | |
+ | | rowspan="2"|{{Soy}} + {{Paintings}} + {{Armor}}<br />130 total<br />({{IDIA}} 975) |
| − | | |
+ | | rowspan="2"|{{Diplomacy}}<br />325 |
|- |
|- |
||
| − | | |
+ | | [[File:J_SS_Japanese_Diplomacy6.png|80px|Tea House]]<br />[[Feudal Japan Settlement#Diplomacy Buildings|Tea House]] |
|- |
|- |
||
| − | | |
+ | | [[File:R_SS_Japanese_Residential3.png|80px|Shinden-Zukuri Manor]]<br />[[Feudal Japan Settlement#Residential Buildings|Shinden-Zukuri Manor]] |
| − | | |
+ | | {{Soy}} + {{Paintings}} + {{Armor}} + {{Instruments}}<br />155 total<br />({{IDIA}} 1,195) |
| − | | |
+ | | {{Diplomacy}}<br />420 |
|- |
|- |
||
| − | | |
+ | | [[File:J_SS_Japanese_Diplomacy4.png|80px|Zen Garden]]<br />[[Feudal Japan Settlement#Diplomacy Buildings|Zen Garden]] |
| − | | |
+ | | {{Soy}} + {{Paintings}} + {{Armor}} + {{Instruments}}<br />180 total<br />({{IDIA}} 1,425) |
| − | | |
+ | | {{Diplomacy}}<br />525 |
|- |
|- |
||
| − | | |
+ | | [[File:J_SS_Japanese_Diplomacy7.png|80px|Dojo]]<br />[[Feudal Japan Settlement#Diplomacy Buildings|Dojo]] |
| − | | |
+ | | {{Soy}} + {{Paintings}} + {{Armor}} + {{Instruments}}<br />205 total<br />({{IDIA}} 1,665) |
| − | | |
+ | | {{Diplomacy}}<br />640 |
|} |
|} |
||
== Settlement Rewards == |
== Settlement Rewards == |
||
| − | Each finished [[ |
+ | Each finished [[Feudal Japan Settlement]] will provide a different reward for use in your main city. Collect them all to get the strongest buildings and [[#Emissaries|emissaries]]. |
| − | {| class=" |
+ | {| class="FoETable" |
! style="width:100px" |Finished |
! style="width:100px" |Finished |
||
| − | ! style="width:200px; |
+ | ! style="width:200px;" |Reward |
| − | ! style="width:200px; |
+ | ! style="width:200px;" |Extra Reward |
|- |
|- |
||
| − | | |
+ | | [[File:Reward_icon_cop_japanese.png|Finish Settlement|70px]]<br /><big>Nr. 1</big> |
| − | | |
+ | | [[File:Shinto_Temple_Lvl_1.png|80px]]<br />[[Shinto Temple|Shinto Temple Level 1]] |
| ⚫ | |||
| − | | style="text-align:center" | |
||
|- |
|- |
||
| − | | |
+ | | [[File:Reward_icon_cop_japanese.png|Finish Settlement|70px]]<br /><big>Nr. 2</big> |
| − | | |
+ | | [[File:Emissaries_Nobunaga.png|Oda Nobunaga|80px|link=Feudal Japan#Emissaries]]<br />[[Feudal Japan#Emissaries|Emissary]] Oda Nobunaga |
| − | | |
+ | | [[File:Emissaries Slot.png|80px|Emissaries Slot]]<br />Emissaries Slot |
|- |
|- |
||
| − | | |
+ | | [[File:Reward_icon_cop_japanese.png|Finish Settlement|70px]]<br /><big>Nr. 3</big> |
| − | | |
+ | | [[File:Shinto_Temple_Upgrade_Kit.png|80px]]<br />[[Shinto Temple]] Upgrade |
| + | | |
||
| − | | style="text-align:center" | |
||
|- |
|- |
||
| − | | |
+ | | [[File:Reward_icon_cop_japanese.png|Finish Settlement|70px]]<br /><big>Nr. 4</big> |
| − | | |
+ | | [[File:Shinto_Temple_Upgrade_Kit.png|80px]]<br />[[Shinto Temple]] Upgrade |
| + | | |
||
| − | | style="text-align:center" | |
||
|- |
|- |
||
| − | | |
+ | | [[File:Reward_icon_cop_japanese.png|Finish Settlement|70px]]<br /><big>Nr. 5</big> |
| − | | |
+ | | [[File:Shinto_Temple_Upgrade_Kit.png|80px]]<br />[[Shinto Temple]] Upgrade |
| + | | |
||
| − | | style="text-align:center" | |
||
|- |
|- |
||
| − | | |
+ | | [[File:Reward_icon_cop_japanese.png|Finish Settlement|70px]]<br /><big>Nr. 6</big> |
| − | | |
+ | | [[File:Emissary_gozen.png|Tomoe Gozen|80px|link=Feudal Japan#Emissaries]]<br />[[Feudal Japan#Emissaries|Emissary]] Tomoe Gozen |
| + | | |
||
| − | | style="text-align:center" | |
||
|- |
|- |
||
| − | | |
+ | | [[File:Reward_icon_cop_japanese.png|Finish Settlement|70px]]<br /><big>Nr. 7</big> |
| − | | |
+ | | [[File:Shinto_Temple_Upgrade_Kit.png|80px]]<br />[[Shinto Temple]] Upgrade |
| + | | |
||
| − | | style="text-align:center" | |
||
|- |
|- |
||
| − | | |
+ | | [[File:Reward_icon_cop_japanese.png|Finish Settlement|70px]]<br /><big>Nr. 8</big> |
| − | | |
+ | | [[File:Shinto_Temple_Upgrade_Kit.png|80px]]<br />[[Shinto Temple]] Upgrade |
| + | | |
||
| − | | style="text-align:center" | |
||
|- |
|- |
||
| − | | |
+ | | [[File:Reward_icon_cop_japanese.png|Finish Settlement|70px]]<br /><big>Nr. 9</big> |
| − | | |
+ | | [[File:Emissary_Shingen.png|Takeda Shingen|80px|link=Feudal Japan#Emissaries]]<br />[[Feudal Japan#Emissaries|Emissary]] Takeda Shingen |
| − | | |
+ | | [[File:Emissaries Slot.png|80px|Emissaries Slot]]<br />Emissaries Slot |
|- |
|- |
||
| − | | |
+ | | [[File:Reward_icon_cop_japanese.png|Finish Settlement|70px]]<br /><big>Nr. 10</big> |
| − | | |
+ | | [[File:Shinto_Temple_Upgrade_Kit.png|80px]]<br />[[Shinto Temple]] Upgrade |
| + | | |
||
| − | | style="text-align:center" | |
||
|- |
|- |
||
| − | | |
+ | | [[File:Reward_icon_cop_japanese.png|Finish Settlement|70px]]<br /><big>Nr. 11</big> |
| − | | |
+ | | [[File:Shinto_Temple_Upgrade_Kit.png|80px]]<br />[[Shinto Temple]] Upgrade |
| + | | |
||
| − | | style="text-align:center" | |
||
|- |
|- |
||
| − | | |
+ | | [[File:Reward_icon_cop_japanese.png|Finish Settlement|70px]]<br /><big>Nr. 12</big> |
| − | | |
+ | | [[File:Emissary_Oichi.png|80px|Oda Oichi|link=Feudal Japan#Emissaries]]<br />[[Feudal Japan#Emissaries|Emissary]] Oda Oichi |
| + | | |
||
| − | | style="text-align:center" | |
||
|- |
|- |
||
| − | | |
+ | | [[File:Reward_icon_cop_japanese.png|Finish Settlement|70px]]<br /><big>Nr. 13</big> |
| − | | |
+ | | [[File:Shinto_Temple_Upgrade_Kit.png|80px]]<br />[[Shinto Temple]] Upgrade |
| + | | |
||
| − | | style="text-align:center" | |
||
|- |
|- |
||
| − | | |
+ | | [[File:Reward_icon_cop_japanese.png|Finish Settlement|70px]]<br />[[File:Infinite.png|40px|link=]] |
| − | | |
+ | | [[File:Forge.png|80px]]<br />50 [[Forge Point]]s |
| + | | |
||
| − | | style="text-align:center" | |
||
|} |
|} |
||
== Time Rewards == |
== Time Rewards == |
||
| − | When finishing the [[ |
+ | When finishing the [[Feudal Japan Settlement]] within a certain time frame, the player will get an additional reward: [[fragments]] of the [[Selection Kit#Timeless Dojo Selection Kit|Timeless Dojo Selection Kit]].[[File:Timeless_Dojo_Selection_Kit_Fragment.png|left|70px|Fragment of Timeless Dojo Selection Kit]] It takes 15 fragments to obtain the Timeless Dojo Selection Kit, which gives the player a choice between a [[Timeless Dojo|Timeless Dojo Level 1]] or a [[Upgrade Kit#Timeless Dojo Upgrade|Timeless Dojo Upgrade]].<br /><br /> |
| − | *'''1st''' reward: [[File:Timeless_Dojo_Selection_Kit_Fragment.png |
+ | *'''1st''' reward: [[File:Timeless_Dojo_Selection_Kit_Fragment.png|20px|Fragment of Timeless Dojo Selection Kit]] '''9''' Fragments of Timeless Dojo Selection Kit |
| − | *'''2nd''' reward: [[File:Timeless_Dojo_Selection_Kit_Fragment.png |
+ | *'''2nd''' reward: [[File:Timeless_Dojo_Selection_Kit_Fragment.png|20px|Fragment of Timeless Dojo Selection Kit]] '''4''' Fragments of Timeless Dojo Selection Kit |
| − | *'''3rd''' reward: [[File:Timeless_Dojo_Selection_Kit_Fragment.png |
+ | *'''3rd''' reward: [[File:Timeless_Dojo_Selection_Kit_Fragment.png|20px|Fragment of Timeless Dojo Selection Kit]] '''2''' Fragment of Timeless Dojo Selection Kit |
| − | The player receives '''all three''' rewards when finishing within the shortest time frame ( |
+ | The player receives '''all three''' rewards when finishing within the shortest time frame (15 fragments total), the second and third reward when finishing within the second time frame (6 fragments total) and only the third reward for finishing within the last time frame (2 fragments). The player will receive no time reward when finishing after the third time frame. |
| − | After each finished settlement, the time frame for the next settlement will be shorter. After finishing 13 |
+ | After each finished settlement, the time frame for the next settlement will be shorter. After finishing 13 Feudal Japan Settlements, the time frame will stay the same for each new Feudal Japan Settlement. |
| − | {| class=" |
+ | {| class="FoETable" |
! style="width:100px" |Settlement |
! style="width:100px" |Settlement |
||
| − | ! style="width:175px; |
+ | ! style="width:175px;" |[[File:Timeless_Dojo_Selection_Kit_Fragment.png|20px|Fragment of Timeless Dojo Selection Kit]]9 Fragments |
| − | ! style="width:175px; |
+ | ! style="width:175px;" |[[File:Timeless_Dojo_Selection_Kit_Fragment.png|20px|Fragment of Timeless Dojo Selection Kit]]4 Fragments |
| − | ! style="width:175px; |
+ | ! style="width:175px;" |[[File:Timeless_Dojo_Selection_Kit_Fragment.png|20px|Fragment of Timeless Dojo Selection Kit]]2 Fragments |
|- |
|- |
||
|[[File:Reward_icon_cop_japanese.png|Finish Settlement|30px]] Nr. 1 |
|[[File:Reward_icon_cop_japanese.png|Finish Settlement|30px]] Nr. 1 |
||
| − | | |
+ | | {{ITIM}}14 days |
| − | | |
+ | | {{ITIM}}17 days |
| − | | |
+ | | {{ITIM}}20 days |
|- |
|- |
||
|[[File:Reward_icon_cop_japanese.png|Finish Settlement|30px]] Nr. 2 |
|[[File:Reward_icon_cop_japanese.png|Finish Settlement|30px]] Nr. 2 |
||
| + | | {{ITIM}}13 days, 11 hours, 4 min 36 sec |
||
| − | | style="text-align:center" |{{ITIM}}??? |
||
| + | | {{ITIM}}16 days, 8 hours, 18 min 27 sec |
||
| − | | style="text-align:center" |{{ITIM}}??? |
||
| + | | {{ITIM}}19 days, 5 hours, 32 min 18 sec |
||
| − | | style="text-align:center" |{{ITIM}}??? |
||
|- |
|- |
||
|[[File:Reward_icon_cop_japanese.png|Finish Settlement|30px]] Nr. 3 |
|[[File:Reward_icon_cop_japanese.png|Finish Settlement|30px]] Nr. 3 |
||
| + | | {{ITIM}}12 days, 22 hours, 9 min 13 sec |
||
| − | | style="text-align:center" |{{ITIM}}??? |
||
| + | | {{ITIM}}15 days, 16 hours, 36 min 54 sec |
||
| − | | style="text-align:center" |{{ITIM}}??? |
||
| + | | {{ITIM}}18 days, 11 hours, 4 min 35 sec |
||
| − | | style="text-align:center" |{{ITIM}}??? |
||
|- |
|- |
||
|[[File:Reward_icon_cop_japanese.png|Finish Settlement|30px]] Nr. 4 |
|[[File:Reward_icon_cop_japanese.png|Finish Settlement|30px]] Nr. 4 |
||
| + | | {{ITIM}}12 days, 9 hours, 13 min 49 sec |
||
| − | | style="text-align:center" |{{ITIM}}??? |
||
| + | | {{ITIM}}15 days, 0 hours, 55 min 21 sec |
||
| − | | style="text-align:center" |{{ITIM}}??? |
||
| + | | {{ITIM}}17 days, 16 hours, 36 min 53 sec |
||
| − | | style="text-align:center" |{{ITIM}}??? |
||
|- |
|- |
||
|[[File:Reward_icon_cop_japanese.png|Finish Settlement|30px]] Nr. 5 |
|[[File:Reward_icon_cop_japanese.png|Finish Settlement|30px]] Nr. 5 |
||
| + | | {{ITIM}}11 days, 20 hours, 18 min 25 sec |
||
| − | | style="text-align:center" |{{ITIM}}??? |
||
| + | | {{ITIM}}14 days, 9 hours, 13 min 48 sec |
||
| − | | style="text-align:center" |{{ITIM}}??? |
||
| + | | {{ITIM}}16 days, 22 hours, 9 min 11 sec |
||
| − | | style="text-align:center" |{{ITIM}}??? |
||
|- |
|- |
||
|[[File:Reward_icon_cop_japanese.png|Finish Settlement|30px]] Nr. 6 |
|[[File:Reward_icon_cop_japanese.png|Finish Settlement|30px]] Nr. 6 |
||
| + | | {{ITIM}}11 days, 7 hours, 23 min 2 sec |
||
| − | | style="text-align:center" |{{ITIM}}??? |
||
| + | | {{ITIM}}13 days, 17 hours, 32 min 15 sec |
||
| − | | style="text-align:center" |{{ITIM}}??? |
||
| + | | {{ITIM}}16 days, 3 hours, 41 min 28 sec |
||
| − | | style="text-align:center" |{{ITIM}}??? |
||
|- |
|- |
||
|[[File:Reward_icon_cop_japanese.png|Finish Settlement|30px]] Nr. 7 |
|[[File:Reward_icon_cop_japanese.png|Finish Settlement|30px]] Nr. 7 |
||
| + | | {{ITIM}}10 days, 18 hours, 27 min 38 sec |
||
| − | | style="text-align:center" |{{ITIM}}??? |
||
| + | | {{ITIM}}13 days, 1 hours, 50 min 42 sec |
||
| − | | style="text-align:center" |{{ITIM}}??? |
||
| + | | {{ITIM}}15 days, 9 hours, 13 min 46 sec |
||
| − | | style="text-align:center" |{{ITIM}}??? |
||
|- |
|- |
||
|[[File:Reward_icon_cop_japanese.png|Finish Settlement|30px]] Nr. 8 |
|[[File:Reward_icon_cop_japanese.png|Finish Settlement|30px]] Nr. 8 |
||
| + | | {{ITIM}}10 days, 5 hours, 32 min 15 sec |
||
| − | | style="text-align:center" |{{ITIM}}??? |
||
| + | | {{ITIM}}12 days, 10 hours, 9 min 9 sec |
||
| − | | style="text-align:center" |{{ITIM}}??? |
||
| + | | {{ITIM}}14 days, 14 hours, 46 min 4 sec |
||
| − | | style="text-align:center" |{{ITIM}}??? |
||
|- |
|- |
||
|[[File:Reward_icon_cop_japanese.png|Finish Settlement|30px]] Nr. 9 |
|[[File:Reward_icon_cop_japanese.png|Finish Settlement|30px]] Nr. 9 |
||
| + | | {{ITIM}}9 days, 16 hours, 36 min 51 sec |
||
| − | | style="text-align:center" |{{ITIM}}??? |
||
| + | | {{ITIM}}11 days, 18 hours, 27 min 36 sec |
||
| − | | style="text-align:center" |{{ITIM}}??? |
||
| + | | {{ITIM}}13 days, 20 hours, 18 min 21 sec |
||
| − | | style="text-align:center" |{{ITIM}}??? |
||
|- |
|- |
||
|[[File:Reward_icon_cop_japanese.png|Finish Settlement|30px]] Nr. 10 |
|[[File:Reward_icon_cop_japanese.png|Finish Settlement|30px]] Nr. 10 |
||
| + | | {{ITIM}}9 days, 3 hours, 41 min 27 sec |
||
| − | | style="text-align:center" |{{ITIM}}??? |
||
| + | | {{ITIM}}11 days, 2 hours, 46 min 3 sec |
||
| − | | style="text-align:center" |{{ITIM}}??? |
||
| + | | {{ITIM}}13 days, 1 hours, 50 min 39 sec |
||
| − | | style="text-align:center" |{{ITIM}}??? |
||
|- |
|- |
||
|[[File:Reward_icon_cop_japanese.png|Finish Settlement|30px]] Nr. 11 |
|[[File:Reward_icon_cop_japanese.png|Finish Settlement|30px]] Nr. 11 |
||
| + | | {{ITIM}}8 days, 14 hours, 46 min 4 sec |
||
| − | | style="text-align:center" |{{ITIM}}??? |
||
| + | | {{ITIM}}10 days, 11 hours, 4 min 30 sec |
||
| − | | style="text-align:center" |{{ITIM}}??? |
||
| + | | {{ITIM}}12 days, 7 hours, 22 min 57 sec |
||
| − | | style="text-align:center" |{{ITIM}}??? |
||
|- |
|- |
||
|[[File:Reward_icon_cop_japanese.png|Finish Settlement|30px]] Nr. 12 |
|[[File:Reward_icon_cop_japanese.png|Finish Settlement|30px]] Nr. 12 |
||
| + | | {{ITIM}}8 days, 1 hours, 50 min 40 sec |
||
| − | | style="text-align:center" |{{ITIM}}??? |
||
| + | | {{ITIM}}9 days, 19 hours, 22 min 57 sec |
||
| − | | style="text-align:center" |{{ITIM}}??? |
||
| + | | {{ITIM}}11 days, 12 hours, 55 min 14 sec |
||
| − | | style="text-align:center" |{{ITIM}}??? |
||
|- |
|- |
||
|[[File:Reward_icon_cop_japanese.png|Finish Settlement|30px]] Nr. 13 |
|[[File:Reward_icon_cop_japanese.png|Finish Settlement|30px]] Nr. 13 |
||
| + | | {{ITIM}}7 days, 12 hours, 55 min 16 sec |
||
| − | | style="text-align:center" |{{ITIM}}??? |
||
| + | | {{ITIM}}9 days, 3 hours, 41 min 24 sec |
||
| − | | style="text-align:center" |{{ITIM}}??? |
||
| + | | {{ITIM}}10 days, 18 hours, 27 min 32 sec |
||
| − | | style="text-align:center" |{{ITIM}}??? |
||
|- |
|- |
||
| − | |[[File:Reward_icon_cop_japanese.png|Finish Settlement|30px]] [[File:Infinite.png|30px]] |
+ | |[[File:Reward_icon_cop_japanese.png|Finish Settlement|30px]] [[File:Infinite.png|30px|link=]] |
| + | | {{ITIM}}6 days, 23 hours, 59 min 53 sec |
||
| − | | style="text-align:center" |{{ITIM}}??? |
||
| + | | {{ITIM}}8 days, 11 hours, 59 min 51 sec |
||
| − | | style="text-align:center" |{{ITIM}}??? |
||
| + | | {{ITIM}}9 days, 23 hours, 59 min 50 sec |
||
| − | | style="text-align:center" |{{ITIM}}??? |
||
|} |
|} |
||
== Emissaries == |
== Emissaries == |
||
| − | When placed in your [[Town Hall]], each emissary provides a unique bonus on top of your regular Town Hall production. The first emissary will become available, along with the first emissary slot, after finishing '''two''' |
+ | When placed in your [[Cultural Settlements#Emissaries|Town Hall]], each [[Emissaries|emissary]] provides a unique bonus on top of your regular Town Hall production. The first emissary will become available, along with the first emissary slot, after finishing '''two''' Feudal Japan Settlements. |
| − | {| class=" |
+ | <onlyinclude>{| class="FoETable WrapTable" |
| − | ! |
+ | ! Emissary |
| − | ! |
+ | ! Bonus |
| − | ! style="width:150px" |Emissary |
||
| − | ! style="width:150px" |Bonus |
||
|- |
|- |
||
| − | | |
+ | | [[File:Emissaries_Nobunaga.png|70px|Oda Nobunaga]]<br />Oda Nobunaga |
| − | | |
+ | | {{FP}} 1 [[Forge Point]] |
| ⚫ | |||
| ⚫ | |||
|- |
|- |
||
| − | | |
+ | | [[File:Emissary_Shingen.png|70px|Takeda Shingen]]<br />Takeda Shingen |
| − | | |
+ | | {{Goods}} 2 [[Goods]]<br />of your age |
| + | |- |
||
| − | + | |[[File:Emissary_gozen.png|70px|Tomoe Gozen]]<br />Tomoe Gozen |
|
| − | | |
+ | | {{IMU}} 1 [[Military Unit]]<br />of your age |
| ⚫ | |||
| + | |- |
||
| − | |||
| ⚫ | |||
| − | === Town Hall === |
||
| ⚫ | |||
| − | Open the [[Town Hall]] to enter the Emissaries window. Here you can add and change emissaries to gain their boosts and unlock new emissary slots, either by winning them or with [[diamonds]]. There are currently 8 emissary slots that can be unlocked. |
||
| + | |}</onlyinclude> |
||
| − | [[File:Viking Emissaries Town Hall.png|left|frame|Town Hall Emissaries Window]] |
||
{{Clear}} |
{{Clear}} |
||
== See Also == |
== See Also == |
||
* [[Cultural settlements]] |
* [[Cultural settlements]] |
||
| − | * [[ |
+ | * [[Feudal Japan Settlement]] |
== Notes == |
== Notes == |
||
<references /> |
<references /> |
||
| + | [[Category:Japanese]] |
||
| + | [[Category:Cultural Settlements]] |
||
| + | [[Category:Feudal Japan]] |
||
Revision as of 10:52, 13 November 2019

As the Daimyo of his village, it is your task to lead Feudal Japan to prosperity!
Introduction
Feudal Japan is the second culture of the Cultural settlements, introduced to the game on July 10, 2019. Construct Feudal Japan Settlement buildings and gain their resources to unlock embassy advancements. Finish the settlement by completing all quests to gain unique settlement rewards.
This page explains the workings of the quests, embassy advancements and rewards, for information about the settlement and it's buildings check the Feudal Japan Settlement page.
Milestone Rewards

| Complete 6 quests: |
Complete 9 quests: |
Complete 13 quests: |
Complete 17 quests: |
| File:Goods (big).png | 
|
||
| Unlock Merchant | 10 of each Good of your age | 5 Fragments of Shrine of Knowledge | Finish Settlement |
.png)
Quests


Akechi Mitsuhide
Finish all 17 quests presented by Akechi Mitsuhide to finish the Feudal Japan Settlement. The quest rewards consist of items for the player's main city, like coins, supplies, Forge Points and Self-Aid Kits.
- Akechi Mitsuhide: "Have 3 Gasshō-zukuri Hut"
Reward:
- Akechi Mitsuhide: "Have 5 Tōrō"
Reward:
- Akechi Mitsuhide: "Have 1 Soy Bean Field"
Reward:
- Akechi Mitsuhide: "Have 45 diplomacy OR Gather 10 Soy"
Reward:
- Akechi Mitsuhide: "Have 1 Shinto Shrine"
Reward:
- Akechi Mitsuhide: "Have 1 Gallery"
Reward:
- Akechi Mitsuhide: "Gather 10 Paintings"
Reward:
- Akechi Mitsuhide: "Have 100 diplomacy OR Gather 20 Paintings"
Reward:
- Akechi Mitsuhide: "Have 2 Decorated Torii Gate OR Have 2 Sacred Torii Gate"
Reward:
- Akechi Mitsuhide: "Have 325 Diplomacy"
Reward:
- Akechi Mitsuhide: "Have 1 Instrument Workshop"
Reward:
- Akechi Mitsuhide: "Have 2 Shinden-Zukuri Manors"
Reward:
- Akechi Mitsuhide: "Have 525 diplomacy OR Gather 30 Instruments"
Reward:
- Akechi Mitsuhide: "Have 2 Zen Gardens"
Reward:
- Akechi Mitsuhide: "Have 1 Dojo"
Reward:
- Akechi Mitsuhide: "Gather
Reward:
Embassy Advancements
Cultural Goods and Diplomacy
Embassy Advancements have to be unlocked in order to build new settlement buildings and to be able to unlock the next advancement. Embassy Advancements can be unlocked by paying a certain amount of cultural goods, while having the requested amount of diplomacy. Although the total amount of cultural goods and the type of goods is the same for every player, the amount of each good can be different.
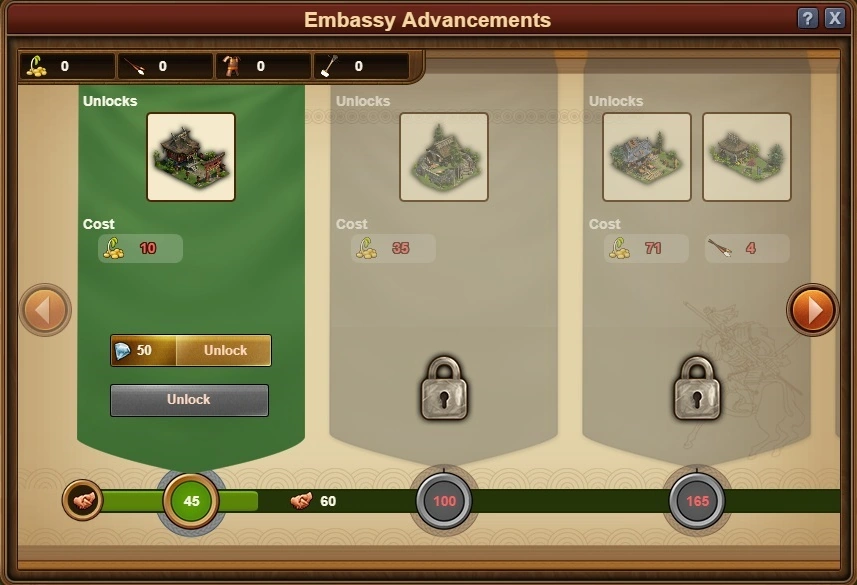
The table below shows the total amount of cultural goods and the possible type of goods needed for each advancement. It can happen that one of the possible goods requires 0 amount and is not shown to the player. The total amount of cultural goods needed to unlock all advancements is 895.
Using Diamonds
When lacking cultural goods or diplomacy to unlock an advancement, the player can use diamonds. The amount of diamonds needed depends on the amount of cultural goods and diplomacy still needed to unlock the next advancement. Each
![]() 1 diplomacy costs
1 diplomacy costs ![]() 1 diamond, each
1 diamond, each ![]() 1 cultural good costs
1 cultural good costs ![]() 5 diamonds.
5 diamonds.
Example: the first advancement costs ![]() 10 soy and requires
10 soy and requires
![]() 45 diplomacy, the total diamond cost will be 10*5 + 45 =
45 diplomacy, the total diamond cost will be 10*5 + 45 = ![]() 95 diamonds. A player has
95 diamonds. A player has ![]() 5 soy in stock and
5 soy in stock and
![]() 40 diplomacy in their city, missing
40 diplomacy in their city, missing ![]() 5 soy and
5 soy and
![]() 5 diplomacy. This will cost 5*5 + 5 =
5 diplomacy. This will cost 5*5 + 5 = ![]() 30 diamonds to unlock the advancement, plus the
30 diamonds to unlock the advancement, plus the ![]() 5 soy in stock.
5 soy in stock.
The amount of diamonds shown below is the maximum diamond cost for each advancement, when no goods or diplomacy would be used at all. The total cost of all advancements would then be ![]() 6,935.
6,935.
Warning: before using diamonds, be aware that when finishing a settlement (or abandoning one), the settlement will be reset and all buildings, goods in stock, advancements and expansions will be lost, including those unlocked with diamonds.
| Advancement |
| |
|---|---|---|
 Shinto Shrine |
10 total ( |
|
 Gallery |
35 total ( |
|
 Armorer |
75 total ( |
|
 Shoin-zukuri House | ||
 Decorated Torii Gate |
105 total ( |
|
 Sacred Torii Gate | ||
 Instrument Workshop |
130 total ( |
|
 Tea House | ||
 Shinden-Zukuri Manor |
155 total ( |
|
Zen Garden |
180 total ( |
|
 Dojo |
205 total ( |
|
Settlement Rewards
Each finished Feudal Japan Settlement will provide a different reward for use in your main city. Collect them all to get the strongest buildings and emissaries.
| Finished | Reward | Extra Reward |
|---|---|---|
Nr. 1 |
Shinto Temple Level 1 |
|
Nr. 2 |
 Emissary Oda Nobunaga |
 Emissaries Slot |
Nr. 3 |
 Shinto Temple Upgrade |
|
Nr. 4 |
Shinto Temple Upgrade |
|
Nr. 5 |
Shinto Temple Upgrade |
|
Nr. 6 |
 Emissary Tomoe Gozen |
|
Nr. 7 |
Shinto Temple Upgrade |
|
Nr. 8 |
Shinto Temple Upgrade |
|
Nr. 9 |
 Emissary Takeda Shingen |
Emissaries Slot |
Nr. 10 |
Shinto Temple Upgrade |
|
Nr. 11 |
Shinto Temple Upgrade |
|
Nr. 12 |
 Emissary Oda Oichi |
|
Nr. 13 |
Shinto Temple Upgrade |
|
 50 Forge Points |
Time Rewards
When finishing the Feudal Japan Settlement within a certain time frame, the player will get an additional reward: fragments of the Timeless Dojo Selection Kit.

It takes 15 fragments to obtain the Timeless Dojo Selection Kit, which gives the player a choice between a Timeless Dojo Level 1 or a Timeless Dojo Upgrade.
- 1st reward:
 9 Fragments of Timeless Dojo Selection Kit
 - 2nd reward: 4 Fragments of Timeless Dojo Selection Kit
- 3rd reward: 2 Fragment of Timeless Dojo Selection Kit
The player receives all three rewards when finishing within the shortest time frame (15 fragments total), the second and third reward when finishing within the second time frame (6 fragments total) and only the third reward for finishing within the last time frame (2 fragments). The player will receive no time reward when finishing after the third time frame.
After each finished settlement, the time frame for the next settlement will be shorter. After finishing 13 Feudal Japan Settlements, the time frame will stay the same for each new Feudal Japan Settlement.
| Settlement | |||
|---|---|---|---|
Emissaries
When placed in your Town Hall, each emissary provides a unique bonus on top of your regular Town Hall production. The first emissary will become available, along with the first emissary slot, after finishing two Feudal Japan Settlements.
| Emissary | Bonus |
|---|---|
 Oda Nobunaga |
|
 Takeda Shingen |
of your age |
 Tomoe Gozen |
of your age |
 Oda Oichi |