No edit summary Tag: sourceedit |
No edit summary Tag: Visual edit |
||
| (14 intermediate revisions by 5 users not shown) | |||
| Line 1: | Line 1: | ||
| − | {{Stub}} |
||
| − | |||
{{Infobox Province |
{{Infobox Province |
||
|name = The Province of {{PAGENAME}} |
|name = The Province of {{PAGENAME}} |
||
| − | |image = |
+ | |image =File:Piotr.png |
| − | |caption = |
+ | |caption = Tsar Piotr |
| ⚫ | |||
| − | |||
| ⚫ | |||
| ⚫ | |||
| + | |Scouting Cost = 140,000 |
||
| ⚫ | |||
| − | |Scouting |
+ | |Scouting Time = 2 days 7:43:20 from [[Uceria]] |
| − | |Scouting Time = 2 days 8 hours 15 minutes |
||
|Infiltration Cost = 10,000 |
|Infiltration Cost = 10,000 |
||
| − | |Defense = +20 |
+ | |Defense = +20% |
| − | |Reward = |
+ | |Reward = {{IEXP}} |
}} |
}} |
||
| + | == Information == |
||
| ⚫ | |||
| + | Gorski is the tenth and last province of the [[Progressive Era]], accessible after all other PE provinces are under the player's control. Taking control of Gorski grants access to the [[Modern Era]] continent map (costing {{ICOI}} 115,000 and 1 day 2:23:20 to explore) and the first province there, [[Inashu]]. |
||
| ⚫ | |||
| + | |Content1=My people are starving. I am afraid they might start an uprising and try to overthrow me, their Tsar. But I will defend my position by any means necessary. But first, I need certain goods. |
||
| + | |Content2=I will not fall! I will defend my position, whatever it takes. And when I am finally victorious, my people will love me again! |
||
| + | |Content3=Your army will perish in the vastness of Gorski. |
||
| ⚫ | |||
| + | |||
| + | {{ProvinceMap |
||
| + | |Map=Gorski.png |
||
| + | |Sector1Army1= |
||
| + | *4 [[Conscript]] |
||
| ⚫ | |||
| + | *1 [[Tank]] |
||
| ⚫ | |||
| ⚫ | |||
| + | |Sector1Loot={{ICOI}} 7,000 |
||
| + | |||
| + | |Sector2Army1= |
||
| + | *3 [[Armored Car]] |
||
| + | *3 [[Tank]] |
||
| ⚫ | |||
| ⚫ | |||
| + | |Sector2Loot={{ISUP}} 5,000 |
||
| + | |||
| + | |Sector3Army1= |
||
| + | *2 [[Tank]] |
||
| + | *2 [[Conscript]] |
||
| + | *3 [[Sniper]] |
||
| + | *1 [[Rapid Fire Cannon]] |
||
| ⚫ | |||
| + | |Sector3Loot={{ICOI}} 7,000 |
||
| + | |||
| + | |Sector4Army1= |
||
| + | *6 [[Conscript]] |
||
| + | *1 [[Sniper]] |
||
| + | *1 [[Tank]] |
||
| ⚫ | |||
| + | |Sector4Loot={{ISUP}} 5,000 |
||
| + | |||
| + | |Sector5Army1= |
||
| + | *6 [[Conscript]] |
||
| + | *2 [[Rapid Fire Cannon]] |
||
| ⚫ | |||
| + | |Sector5Loot={{ICOI}} 7,000 |
||
| + | |||
| + | |Sector6Army1= |
||
| + | *3 [[Sniper]] |
||
| + | *2 [[Conscript]] |
||
| + | *2 [[Armored Car]] |
||
| + | *1 [[Tank]] |
||
| ⚫ | |||
| + | |Sector6Loot={{ISUP}} 5,000 |
||
| + | |||
| + | |Sector7Army1= |
||
| + | *5 [[Armored Car]] |
||
| + | *3 [[Rapid Fire Cannon]] |
||
| ⚫ | |||
| + | |Sector7Loot={{ISUP}} 5,000 |
||
| + | |||
| + | |Sector8Army1= |
||
| + | *3 [[Conscript]] |
||
| + | *3 [[Rapid Fire Cannon]] |
||
| + | *2 [[Armored Car]] |
||
| ⚫ | |||
| + | |Sector8Loot={{ICOI}} 7,000 |
||
| + | |||
| + | |Sector9Army1= |
||
| + | *4 [[Sniper]] |
||
| + | *2 [[Conscript]] |
||
| + | *2 [[Rapid Fire Cannon]] |
||
| ⚫ | |||
| + | |Sector9Loot={{ISUP}} 5,000 |
||
| + | |||
| + | |Sector10Army1= |
||
| + | *4 [[Tank]] |
||
| + | *2 [[Conscript]] |
||
| + | *2 [[Sniper]] |
||
| ⚫ | |||
| + | |Sector10Loot={{ICOI}} 7,000 |
||
| + | |||
| + | |Sector11Army1= |
||
| + | *4 [[Armored Car]] |
||
| + | *3 [[Tank]] |
||
| + | *1 [[Rapid Fire Cannon]] |
||
| ⚫ | |||
| + | |Sector11Loot={{ICOI}} 7,000 |
||
| + | |||
| + | |Sector12Army1= |
||
| + | *6 [[Conscript]] |
||
| + | *2 [[Armored Car]] |
||
| ⚫ | |||
| + | |Sector12Loot={{ISUP}} 5,000 |
||
| + | }} |
||
| − | == Sectors == |
||
| − | {| class="article-table" style="float: center; width: 600px; text-align:center; " border="0" cellpadding="1" cellspacing="1" |
||
| − | |- |
||
| − | | style="" colspan="4" |'''Province Map''' |
||
| − | |- |
||
| − | | colspan="4" style="background-color: #1C0000;" |[[File:Gorski.png|thumb|616x461px]] |
||
| − | |- |
||
| − | | style=" width:80px;" |'''Sector''' |
||
| − | | style=" width:200px;" |'''Defending Army''' |
||
| − | | style=" width:200px;" |'''Negotiation Cost''' |
||
| − | | style=" width:120px;" |'''Loot''' |
||
| − | |- |
||
| − | | style="" |'''1''' |
||
| − | |4 [[Conscript]]<br/>1 [[Armored Car]]<br/>1 [[Tank]]<br/>2 [[Rapid Fire Cannon]] |
||
| ⚫ | |||
| − | |{{Coins}}7,000 |
||
| − | |- |
||
| − | | style="" |'''2''' |
||
| − | |3 [[Armored Car]]<br/>3 [[Tank]]<br/>2 [[Rapid Fire Cannon]] |
||
| ⚫ | |||
| − | |{{Supplies}}5,000 |
||
| − | |- |
||
| − | | style="" |'''3''' |
||
| − | |2 [[Tank]]<br/>2 [[Conscript]]<br/>3 [[Sniper]]<br/>1 [[Rapid Fire Cannon]] |
||
| ⚫ | |||
| − | |{{Coins}}7,000 |
||
| − | |- |
||
| − | | style="" |'''4''' |
||
| − | |6 [[Conscript]]<br/>1 [[Sniper]]<br/>1 [[Tank]] |
||
| ⚫ | |||
| − | |{{Supplies}}5,000 |
||
| − | |- |
||
| − | | style="" |'''5''' |
||
| ⚫ | |||
| ⚫ | |||
| − | |{{Coins}}7,000 |
||
| − | |- |
||
| − | | style="" |'''6''' |
||
| − | |3 [[Sniper]]<br/>2 [[Conscript]]<br/>2 [[Armored Car]]<br/>1 [[Tank]] |
||
| ⚫ | |||
| − | |{{Supplies}}5,000 |
||
| − | |- |
||
| − | | style="" |'''7''' |
||
| ⚫ | |||
| ⚫ | |||
| − | |{{Supplies}}5,000 |
||
| − | |- |
||
| − | | style="" |'''8''' |
||
| − | |3 [[Conscript]]<br/>3 [[Rapid Fire Cannon]]<br/>2 [[Armored Car]] |
||
| ⚫ | |||
| − | |{{Coins}}7,000 |
||
| − | |- |
||
| − | | style="" |'''9''' |
||
| − | |4 [[Sniper]]<br/>2 [[Conscript]]<br/>2 [[Rapid Fire Cannon]] |
||
| ⚫ | |||
| − | |{{Supplies}}5,000 |
||
| − | |- |
||
| − | | style="" |'''10''' |
||
| − | |4 [[Tank]]<br/>2 [[Conscript]]<br/>2 [[Sniper]] |
||
| ⚫ | |||
| − | |{{Coins}}7,000 |
||
| − | |- |
||
| − | | style="" |'''11''' |
||
| − | |4 [[Armored Car]]<br/>3 [[Tank]]<br/>1 [[Rapid Fire Cannon]] |
||
| ⚫ | |||
| − | |{{Coins}}7,000 |
||
| − | |- |
||
| − | | style="" |'''12''' |
||
| ⚫ | |||
| ⚫ | |||
| − | |{{Supplies}}5,000 |
||
| ⚫ | |||
{{Provinces}} |
{{Provinces}} |
||
| + | |||
| − | |||
| ⚫ | |||
[[Category:Progressive Era]] |
[[Category:Progressive Era]] |
||
[[Category:Provinces]] |
[[Category:Provinces]] |
||
| ⚫ | |||
Revision as of 16:21, 25 August 2019
Information
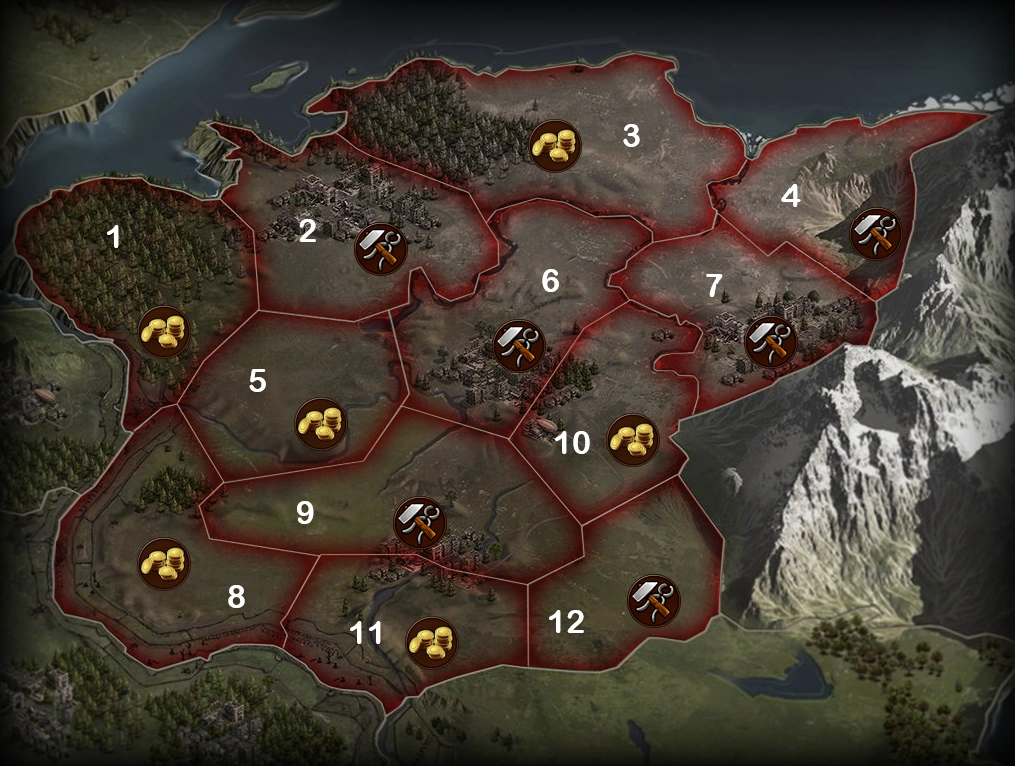
Gorski is the tenth and last province of the Progressive Era, accessible after all other PE provinces are under the player's control. Taking control of Gorski grants access to the Modern Era continent map (costing ![]() 115,000 and 1 day 2:23:20 to explore) and the first province there, Inashu.
115,000 and 1 day 2:23:20 to explore) and the first province there, Inashu.
Narrative
If previous sectors acquired by negotiation:
| “ | TBA | „ |
If at least one sector taken by force:
| “ | TBA | „ |
Attack:
| “ | TBA | „ |
| Province Map | ||||
|---|---|---|---|---|
 | ||||
| Sector | Wave | Defending Army Waves |
Negotiation Cost |
Loot |
| 1 | 1 |
|
||
| 2 | 1 |
|
||
| 3 | 1 |
|
||
| 4 | 1 | |||
| 5 | 1 | |||
| 6 | 1 |
|
||
| 7 | 1 | |||
| 8 | 1 | |||
| 9 | 1 |
|
||
| 10 | 1 | |||
| 11 | 1 |
|
||
| 12 | 1 |
|
||