m (→Map) |
No edit summary Tag: Visual edit |
||
| (3 intermediate revisions by one other user not shown) | |||
| Line 1: | Line 1: | ||
| − | {{Stub}} |
||
{{Infobox Province |
{{Infobox Province |
||
|name = The Province of {{PAGENAME}} |
|name = The Province of {{PAGENAME}} |
||
| Line 13: | Line 12: | ||
|Reward = {{Pearls}} 30 {{Artificial Scales}} 30 {{Corals}} 30 {{Biolight}} 30 {{Plankton}} 30 |
|Reward = {{Pearls}} 30 {{Artificial Scales}} 30 {{Corals}} 30 {{Biolight}} 30 {{Plankton}} 30 |
||
}} |
}} |
||
| − | |||
== Information == |
== Information == |
||
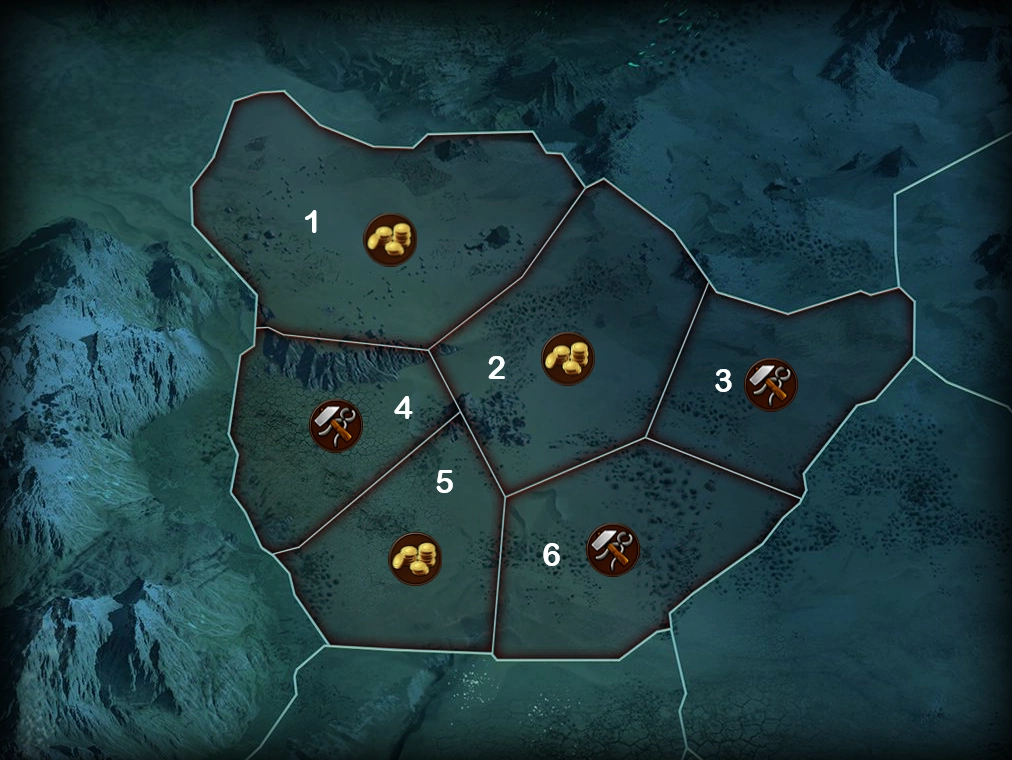
{{PAGENAME}} is the 71st province (Stage 6 Province 1) of the [[Oceanic Future]], accessible after taking control of [[Scuttle Ridge]] on the previous OF continent map. Taking over Neptune's Galleon unlocks [[Scurvy Atoll]] to the south. |
{{PAGENAME}} is the 71st province (Stage 6 Province 1) of the [[Oceanic Future]], accessible after taking control of [[Scuttle Ridge]] on the previous OF continent map. Taking over Neptune's Galleon unlocks [[Scurvy Atoll]] to the south. |
||
| − | + | {{Narrative |
|
| ⚫ | |||
| ⚫ | |||
| ⚫ | |||
| ⚫ | |||
| + | {{ProvinceMap |
||
| − | '''If previous sectors acquired by negotiation:''' |
||
| + | |Map={{PAGENAME}}.png |
||
| + | |Sector1Army1= |
||
| + | *1 [[Gliders]] |
||
| + | *2 [[Hydroelectric Eel]] |
||
| + | *1 [[Medusa]] |
||
| + | *2 [[C.R.A.B. Mech]] |
||
| + | |Sector1Army2= |
||
| + | *2 [[Octopod]] |
||
| + | *3 [[Scimitar]] |
||
| + | *2 [[Hydroelectric Eel]] |
||
| ⚫ | |||
| ⚫ | |||
| + | |Sector2Army1= |
||
| ⚫ | |||
| + | *2 [[Scimitar]] |
||
| + | *1 [[Nautilus]] |
||
| + | *2 [[Turturret]] |
||
| + | *1 [[Medusa]] |
||
| + | |Sector2Army2= |
||
| + | *3 [[C.R.A.B. Mech]] |
||
| + | *1 [[Turturret]] |
||
| + | *2 [[Hydroelectric Eel]] |
||
| + | |Sector2NegotiationCost={{RSUC}} 75 {{RBGC}} 95<br/>{{RPLA}} 135 |
||
| ⚫ | |||
| + | |Sector3Army1= |
||
| − | '''If at least one sector taken by force:''' |
||
| + | *2 [[Sub Cruiser]] |
||
| + | *2 [[Medusa]] |
||
| + | *2 [[Gliders]] |
||
| + | |Sector3Army2= |
||
| + | *3 [[Manta]] |
||
| + | *2 [[Scimitar]] |
||
| + | *2 [[Turturret]] |
||
| ⚫ | |||
| ⚫ | |||
| + | |Sector4Army1= |
||
| ⚫ | |||
| + | *1 [[Manta]] |
||
| + | *2 [[Scimitar]] |
||
| + | *2 [[Sub Cruiser]] |
||
| + | *1 [[Medusa]] |
||
| + | |Sector4Army2= |
||
| + | *3 [[Gliders]] |
||
| + | *2 [[Octopod]] |
||
| + | *1 [[Turturret]] |
||
| + | |Sector4NegotiationCost={{RPRO}} 145 {{RORI}} 160 |
||
| ⚫ | |||
| + | |Sector5Army1= |
||
| − | '''Attack:''' |
||
| + | *2 [[Octopod]] |
||
| + | *2 [[Medusa]] |
||
| + | *2 [[Manta]] |
||
| + | |Sector5Army2= |
||
| + | *2 [[Nautilus]] |
||
| + | *2 [[C.R.A.B. Mech]] |
||
| + | *2 [[Hydroelectric Eel]] |
||
| ⚫ | |||
| ⚫ | |||
| + | |Sector6Army1= |
||
| ⚫ | |||
| + | *3 [[Octopod]] |
||
| − | |||
| + | *1 [[Manta]] |
||
| − | == Map == |
||
| + | *2 [[Medusa]] |
||
| − | {| class="article-table" style="width: 100%; text-align:center; background-color: #0E0000;" border="0" |
||
| + | |Sector6Army2= |
||
| − | |- |
||
| + | *2 [[Nautilus]] |
||
| − | | colspan="6" style="background-color: #800000;" |'''Province Map''' |
||
| + | *2 [[Hydroelectric Eel]] |
||
| − | |- |
||
| + | *2 [[Turturret]] |
||
| − | | colspan="6" style="background-color: #1C0000;" |[[File:{{PAGENAME}}.png|600px|{{PAGENAME}}]] |
||
| ⚫ | |||
| − | |- |
||
| ⚫ | |||
| − | | style="background-color: #800000; width:10%;" |'''Sector''' |
||
| + | }} |
||
| − | | style="background-color: #800000; width:55%;" |'''Defending Army''' |
||
| − | | style="background-color: #800000; width:20%;" |'''Negotiation<br />Cost''' |
||
| − | | style="background-color: #800000; width:15%;" |'''Loot''' |
||
| − | |- |
||
| − | | rowspan="2" style="background-color: #1C0000;" |'''1''' |
||
| − | |'''1.''' {{OFA1}} {{OFA1}} {{OFA1}} {{OFH2}} {{OFH2}} {{OFF1}} |
||
| ⚫ | |||
| ⚫ | |||
| − | |- |
||
| − | |'''2.''' {{OFR1}} {{OFR1}} {{OFR1}} {{OFH1}} {{OFH1}} {{OFF1}} |
||
| − | |- |
||
| − | | rowspan="2" style="background-color: #1C0000;" |'''2''' |
||
| − | |'''1.''' {{OFL1}} {{OFL1}} {{OFF1}} {{OFF1}} {{OFR2}} {{OFR2}} |
||
| ⚫ | |||
| ⚫ | |||
| − | |- |
||
| − | |'''2.''' {{OFR1}} {{OFR1}} {{OFA1}} {{OFA1}} {{OFH1}} {{OFH1}} |
||
| − | |- |
||
| − | | rowspan="2" style="background-color: #1C0000;" |'''3''' |
||
| − | |'''1.''' {{OFL1}} {{OFL1}} {{OFL1}} {{OFA1}} {{OFA1}} {{OFH2}} |
||
| ⚫ | |||
| ⚫ | |||
| − | |- |
||
| − | |'''2.''' {{OFH2}} {{OFH1}} {{OFF1}} {{OFF1}} {{OFL1}} {{OFL1}} |
||
| − | |- |
||
| − | | rowspan="2" style="background-color: #1C0000;" |'''4''' |
||
| − | |'''1.''' {{OFH2}} {{OFH2}} {{OFA1}} {{OFA1}} {{OFR1}} {{OFR1}} |
||
| − | | rowspan="2" |{{RCOR}} 75 {{RBIL}} 65<br/>{{RPLA}} 60 {{RPRO}} 90 |
||
| ⚫ | |||
| − | |- |
||
| − | |'''2.''' {{OFR2}} {{OFR2}} {{OFH1}} {{OFL1}} {{OFL1}} {{OFA1}} |
||
| − | |- |
||
| − | | rowspan="2" style="background-color: #1C0000;" |'''5''' |
||
| − | |'''1.''' {{OFL1}} {{OFL1}} {{OFL1}} {{OFA1}} {{OFA1}} {{OFH2}} |
||
| ⚫ | |||
| ⚫ | |||
| − | |- |
||
| − | |'''2.''' {{OFH2}} {{OFH1}} {{OFF1}} {{OFF1}} {{OFL1}} {{OFL1}} |
||
| − | |- |
||
| − | | rowspan="2" style="background-color: #1C0000;" |'''6''' |
||
| − | |'''1.''' {{OFH2}} {{OFH2}} {{OFA1}} {{OFA1}} {{OFR1}} {{OFR1}} |
||
| − | | rowspan="2" |{{RCOR}} 75 {{RBIL}} 65<br/>{{RPLA}} 60 {{RPRO}} 90 |
||
| ⚫ | |||
| − | |- |
||
| − | |'''2.''' {{OFR2}} {{OFR2}} {{OFH1}} {{OFL1}} {{OFL1}} {{OFA1}} |
||
| ⚫ | |||
== Other Provinces == |
== Other Provinces == |
||
{{Provinces}} |
{{Provinces}} |
||
| + | |||
[[de:Neptuns_Galeone]] |
[[de:Neptuns_Galeone]] |
||
[[Category:Provinces]] |
[[Category:Provinces]] |
||
Revision as of 16:59, 7 September 2019
Information
Neptune's Galleon is the 71st province (Stage 6 Province 1) of the Oceanic Future, accessible after taking control of Scuttle Ridge on the previous OF continent map. Taking over Neptune's Galleon unlocks Scurvy Atoll to the south.
Narrative
If previous sectors acquired by negotiation:
| “ | TBA | „ |
If at least one sector taken by force:
| “ | TBA | „ |
Attack:
| “ | TBA | „ |
| Province Map | ||||
|---|---|---|---|---|
 | ||||
| Sector | Wave | Defending Army Waves |
Negotiation Cost |
Loot |
| 1 | 1 |
|
||
| 2 |
| |||
| 2 | 1 | |||
| 2 | ||||
| 3 | 1 |
|
||
| 2 | ||||
| 4 | 1 |
|
||
| 2 | ||||
| 5 | 1 | |||
| 2 | ||||
| 6 | 1 | |||
| 2 | ||||