m (→Sectors) Tag: sourceedit |
m (→top: "Information" Cleanup, removed: == Information ==) |
||
| (12 intermediate revisions by 4 users not shown) | |||
| Line 1: | Line 1: | ||
| − | {{Stub}} |
||
| ⚫ | {{Infobox Province|name = The Province of Santa Catalina|image = File:Jodido.png |caption = El Hacha Gonzales|Age = Industrial Age|Province Owner = El Hacha Gonzalez|Scouting Cost = 45,000|Scouting Time = 22:53:30|Infiltration Cost = 20,000|Defense = +60% <br/>{{IDEB}} +110% for Sector 5|Reward = {{ISUP}} 60,000 {{ICOI}} 60,000 {{IMED}} 100}} |
||
| − | == Information == |
||
| ⚫ | |||
| ⚫ | {{Infobox Province|name = The Province of Santa Catalina|image = File:Jodido.png |caption = El Hacha Gonzales|Age = Industrial Age|Province Owner = El Hacha Gonzalez|Scouting Cost = 45,000|Scouting Time = |
||
| ⚫ | |||
| + | {{Narrative |
||
| − | == Welcome Text == |
||
| ⚫ | |||
| ⚫ | |||
| ⚫ | |||
| ⚫ | |||
| + | {{ProvinceMap |
||
| − | === First === |
||
| + | |Map=Santa-Catalina.png |
||
| ⚫ | |||
| + | |Sector1Army1= |
||
| + | *4 [[Howitzer]] |
||
| + | *4 [[Rogue]] |
||
| + | |Sector1NegotiationCost={{Rubber}} 20 {{Whale Oil}} 40<br>{{Coke}} 30 {{Textiles}} 10 |
||
| + | |Sector1Loot=5,000 {{ISUP}} |
||
| + | |Sector2Army1= |
||
| − | === Second === |
||
| ⚫ | |||
| ⚫ | |||
| + | * 4 [[Rogue]] |
||
| ⚫ | |||
| + | |Sector2Loot=5,000 {{ISUP}} |
||
| + | |Sector3Army1= |
||
| − | === Attack === |
||
| + | *2 [[Lancer]] |
||
| ⚫ | |||
| + | *2 [[Jaeger Infantry]] |
||
| + | *2 [[Rifleman]] |
||
| + | *2 [[Breech Loader]] |
||
| ⚫ | |||
| + | |Sector3Loot=5,000 {{ICOI}} |
||
| + | |||
| + | |Sector4Army1= |
||
| + | *2 [[Jaeger Infantry]] |
||
| + | *1 [[Howitzer]] |
||
| + | *1 [[Breech Loader]] |
||
| + | *2 [[Rogue]] |
||
| + | *2 [[Lancer]] |
||
| ⚫ | |||
| + | |Sector4Loot=5,000 {{ISUP}} |
||
| + | |||
| + | |Sector5Army1= |
||
| + | *4 [[Grenadier]] |
||
| + | *4 [[Rogue]] |
||
| + | |Sector5NegotiationCost={{Fertilizer}} 10 {{Textiles}} 20<br>{{Rubber}} 30 {{Coke}} 40 |
||
| + | |Sector5Loot=12,500 {{ISUP}} |
||
| + | |||
| + | |Sector6Army1= |
||
| + | *5 [[Rifleman|Riflemen]] |
||
| + | * 3 [[Howitzer]] |
||
| + | |Sector6NegotiationCost={{Rubber}} 20 {{Whale Oil}} 40<br>{{Coke}} 30 {{Textiles}} 10 |
||
| + | |Sector6Loot=5,000 {{ICOI}} |
||
| + | |||
| + | |Sector7Army1= |
||
| + | *2 [[Lancer]] |
||
| + | *2 [[Howitzer]] |
||
| + | *2 [[Rogue]] |
||
| + | *1 [[Rifleman]] |
||
| + | *1 [[Breech Loader]] |
||
| + | |Sector7NegotiationCost={{Rubber}} 10 {{Coke}} 20<br>{{Whale Oil}} 30 {{Fertilizer}} 40 |
||
| + | |Sector7Loot=5,000 {{ICOI}} |
||
| + | |||
| + | |Sector8Army1= |
||
| + | *3 [[Jaeger Infantry]] |
||
| + | *2 [[Lancer]] |
||
| + | *1 [[Rifleman]] |
||
| + | *2 [[Rogue]] |
||
| + | |Sector8NegotiationCost={{Coke}} 10 {{Whale Oil}} 20<br>{{Fertilizer}} 30 {{Textiles}} 40 |
||
| + | |Sector8Loot=5,000 {{ICOI}} |
||
| + | }} |
||
| − | == Sectors == |
||
| − | {| class="article-table" style="float: center; width: 600px; text-align:center; background color: #0E0000;" border="0" cellpadding="1" cellspacing="1" |
||
| − | |- |
||
| − | | colspan="4" style="background-color: #800000" |'''Province Map''' |
||
| − | |- |
||
| − | | colspan="4" style="background-color: #1C0000" |[[File:Santa-Catalina.png|thumb|514x514px]] |
||
| − | |- |
||
| − | | style="background-color: #800000; width:80px;" |'''Sector''' |
||
| − | | style="background-color: #800000; width:200px;" |'''Defending Army''' |
||
| − | | style="background-color: #800000; width:200px;" |'''Negotiation Cost''' |
||
| − | | style="background-color: #800000; width:120px;" |'''Loot''' |
||
| − | |- |
||
| − | | style="background-color: #1C0000;" |'''1''' |
||
| − | | TBA |
||
| − | | TBA |
||
| − | | 5,000 {{Supplies}} |
||
| − | |- |
||
| − | | style="background-color: #1C0000;" |'''2''' |
||
| ⚫ | |||
| ⚫ | |||
| − | | 5,000 {{Supplies}} |
||
| − | |- |
||
| − | | style="background-color: #1C0000;" |'''3''' |
||
| − | | 2 [[Lancer]]<br/>2 [[Jaeger Infantry]]<br/>2 [[Rifleman]]<br/>2 [[Breech Loader]] |
||
| ⚫ | |||
| − | | 5,000 {{Coins}} |
||
| − | |- |
||
| − | | style="background-color: #1C0000;" |'''4''' |
||
| − | | 2 [[Jaeger Infantry]]<br/>1 [[Howitzer]]<br/>1 [[Breech Loader]]<br/>2 [[Rogue]]<br/>2 [[Lancer]] |
||
| ⚫ | |||
| − | | 5,000 {{Supplies}} |
||
| − | |- |
||
| − | | style="background-color: #1C0000;" |'''5''' |
||
| − | | TBA |
||
| − | | TBA |
||
| − | | 12,500 {{Supplies}} |
||
| − | |- |
||
| − | | style="background-color: #1C0000;" |'''6''' |
||
| − | | TBA |
||
| − | | TBA |
||
| − | | 5,000 {{Coins}} |
||
| − | |- |
||
| − | | style="background-color: #1C0000;" |'''7''' |
||
| − | | TBA |
||
| − | | TBA |
||
| − | | 5,000 {{Coins}} |
||
| − | |- |
||
| − | | style="background-color: #1C0000;" |'''8''' |
||
| − | | TBA |
||
| − | | TBA |
||
| − | | 5,000 {{Coins}} |
||
| ⚫ | |||
{{Provinces}} |
{{Provinces}} |
||
[[Category:Provinces]] |
[[Category:Provinces]] |
||
Revision as of 19:14, 20 April 2020
Santa Catalina is a bonus province in the Industrial Age which is unlocked after taking control of Garrincton. Taking control of Santa Catalina grants access to Dorango.
Narrative
If previous sectors acquired by negotiation:
| “ | TBA | „ |
If at least one sector taken by force:
| “ | TBA | „ |
Attack:
| “ | TBA | „ |
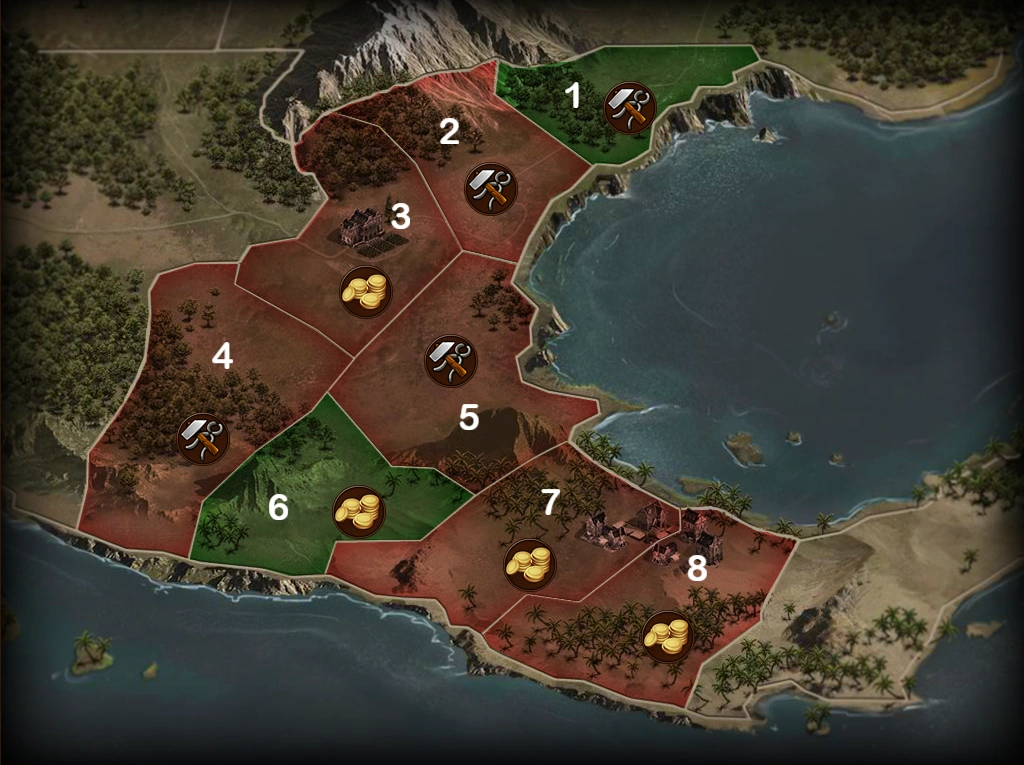
| Province Map | ||||
|---|---|---|---|---|
 | ||||
| Sector | Wave | Defending Army Waves |
Negotiation Cost |
Loot |
| 1 | 1 | 5,000 | ||
| 2 | 1 | 5,000 | ||
| 3 | 1 |
|
5,000 | |
| 4 | 1 |
|
5,000 | |
| 5 | 1 | 12,500 | ||
| 6 | 1 | 5,000 | ||
| 7 | 1 |
|
5,000 | |
| 8 | 1 |
|
5,000 | |