m (→Supply Boost Providers: formatting cleanup, replaced: = = → = =) |
|||
| (3 intermediate revisions by one other user not shown) | |||
| Line 2: | Line 2: | ||
== Supply Boost Providers == |
== Supply Boost Providers == |
||
| + | |||
=== Great Buildings === |
=== Great Buildings === |
||
| + | {| class="FoETable ColumnLeft2 ColumnLeft3" |
||
| − | {| class="article-table" style="text-align:center; background-color:#0E0000" cellspacing="1" cellpadding="1" border="0" |
||
|- |
|- |
||
| − | ! |
+ | ! Building |
! style="width:150px" | |
! style="width:150px" | |
||
| − | ! |
+ | ! Boost |
|- |
|- |
||
|[[File:LighthouseAlexandria.png|100px]] |
|[[File:LighthouseAlexandria.png|100px]] |
||
| − | | |
+ | | [[Lighthouse of Alexandria]] |
| − | | |
+ | | Provides {{ISUP}}+60% supply boost at [[Great Buildings#Upgrade|level 1]] and {{ISUP}}+145% supply boost at level 10. After level 10 {{ISUP}}+5% supply boost is gained with each consecutive level. |
|- |
|- |
||
|[[File:Royalalberthall.png|100px]] |
|[[File:Royalalberthall.png|100px]] |
||
| − | | |
+ | | [[Royal Albert Hall]] |
| − | | |
+ | | Provides {{ISUP}}+70% supply boost at [[Great Buildings#Upgrade|level 1]] and {{ISUP}}+200% supply boost at level 10. After level 10 {{ISUP}}+5% supply boost is gained with each consecutive level. |
|} |
|} |
||
=== Special Buildings === |
=== Special Buildings === |
||
| + | {| class="FoETable ColumnLeft2 ColumnLeft3" |
||
| − | {| class="article-table" style="text-align:center; background-color:#0E0000" cellspacing="1" cellpadding="1" border="0" |
||
|- |
|- |
||
| − | ! |
+ | ! Building |
! style="width:150px" | |
! style="width:150px" | |
||
| − | ! |
+ | ! Boost |
|- |
|- |
||
|[[File:Candlemaker's Tent.png|100px]] |
|[[File:Candlemaker's Tent.png|100px]] |
||
| − | | |
+ | | [[Candlemaker's Tent]] |
| − | | |
+ | | Provides {{ISUP}}+2% supply boost when adjacent to two other different buildings from the [[Winter Village Set]] or {{ISUP}}+5% supply boost when adjacent to three different buildings from the set. The boost values remain constant through the ages. |
|- |
|- |
||
|[[File:Classical Garden Statues.png|100px]] |
|[[File:Classical Garden Statues.png|100px]] |
||
| − | | |
+ | | [[Classical Garden Statues]] |
| − | | |
+ | | Provides from {{ISUP}}+8% to {{ISUP}}+14% supply boost when adjacent to two other building from the [[Classical Garden Set]]. The boost value depends on the buildings age. |
|- |
|- |
||
|[[File:Elephant Fountain.png|100px]] |
|[[File:Elephant Fountain.png|100px]] |
||
| − | | |
+ | | [[Elephant Fountain]] |
| − | | |
+ | | Provides from {{ISUP}}+8% to {{ISUP}}+14% supply boost when adjacent to at least two other different building from the [[Indian Fountain Set]]. The boost value depends on the buildings age. |
|- |
|- |
||
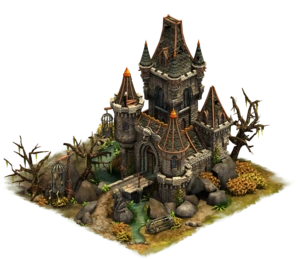
|[[File:Haunted Tower.png|100px]] |
|[[File:Haunted Tower.png|100px]] |
||
| − | | |
+ | | [[Haunted Tower]] |
| − | | |
+ | | Provides from {{ISUP}}+5% to {{ISUP}}+8% supply boost depending on the buildings [[Ages|age]]. |
|- |
|- |
||
|[[File:Ornate Baths.png|100px]] |
|[[File:Ornate Baths.png|100px]] |
||
| − | | |
+ | | [[Ornate Baths]] |
| − | | |
+ | | Provides from {{ISUP}}+5% to {{ISUP}}+10% supply boost depending on the buildings age. |
|- |
|- |
||
|[[File:Pavilion.png|100px]] |
|[[File:Pavilion.png|100px]] |
||
| − | | |
+ | | [[Pavilion]] |
| − | | |
+ | | Provides from {{ISUP}}+8% to {{ISUP}}+14% supply boost depending on the buildings age. |
|- |
|- |
||
|[[File:Shinto Temple Lvl 9.png|100px]] |
|[[File:Shinto Temple Lvl 9.png|100px]] |
||
| − | | |
+ | | [[Shinto Temple]] <br />(Level 2-9) |
| − | | |
+ | | Provides from {{ISUP}}+5% to {{ISUP}}+25% supply boost depending on the buildings age and level. |
|- |
|- |
||
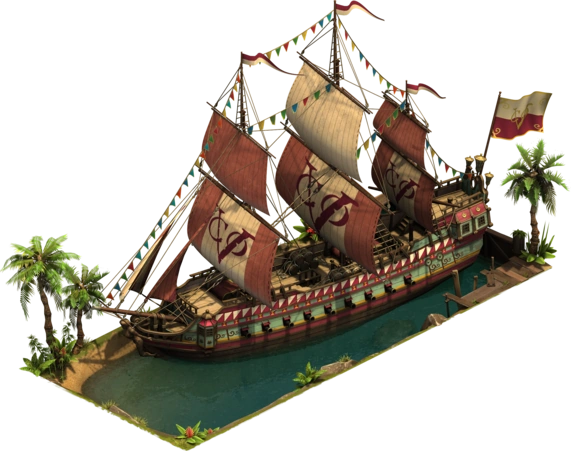
|[[File:The Ship Lvl 7-2.png|100px]] |
|[[File:The Ship Lvl 7-2.png|100px]] |
||
| − | | |
+ | | [[The Ship|The Trader Ship]] |
| − | | |
+ | | Provides {{ISUP}}+10% supply boost. The boost value remains constant through the ages. The Trader Ship is one of the three options when [[Upgrade Kit|upgrading]] [[The Ship]] to level 7. |
| + | |- |
||
| + | |[[File:Trader Guard Post.png|100px]] |
||
| + | | [[Trader Guard Post]] |
||
| + | | Provides from {{ISUP}}+1% to {{ISUP}}+3% supply boost depending on the buildings age. |
||
|} |
|} |
||
=== Items === |
=== Items === |
||
Supply boost items can be randomly gained from the [[Boost Crate|boost crate]] and from various [[Events|events]]. Items can only provide temporary supply boost. |
Supply boost items can be randomly gained from the [[Boost Crate|boost crate]] and from various [[Events|events]]. Items can only provide temporary supply boost. |
||
| + | {| class="FoETable ColumnLeft2 ColumnLeft3" |
||
| − | {| class="article-table" style="text-align:center; background-color:#0E0000" cellspacing="1" cellpadding="1" border="0" |
||
|- |
|- |
||
| + | ! Item |
||
| − | ! style="text-align:left;" |Item |
||
! style="width:150px" | |
! style="width:150px" | |
||
| − | ! |
+ | ! Boost |
|- |
|- |
||
| [[File:Supplies small.png|75px]] |
| [[File:Supplies small.png|75px]] |
||
| − | | |
+ | | '''Small Supply Boost''' |
| − | | |
+ | | Provides {{ISUP}}+10% supply boost for {{ITIM}}8h.<br />Can also be found from [[Incidents#Types of Incidents|rare incidents]]. |
|- |
|- |
||
| [[File:Supplies medium.png|75px]] |
| [[File:Supplies medium.png|75px]] |
||
| − | | |
+ | | '''Medium Supply Boost''' |
| − | | |
+ | | Provides {{ISUP}}+50% supply boost for {{ITIM}}8h. |
|- |
|- |
||
| [[File:Supplies large.png|75px]] |
| [[File:Supplies large.png|75px]] |
||
| − | | |
+ | | '''Large Supply Boost''' |
| − | | |
+ | | Provides {{ISUP}}+100% supply boost for {{ITIM}}8h. |
|} |
|} |
||
=== Friends Tavern === |
=== Friends Tavern === |
||
Temporary supply boost can be bought from the [[Friends Tavern]] for Tavern Silver. |
Temporary supply boost can be bought from the [[Friends Tavern]] for Tavern Silver. |
||
| + | {| class="FoETable ColumnLeft2 ColumnLeft3" |
||
| − | {| class="article-table" style="text-align:center; background-color:#0E0000" cellspacing="1" cellpadding="1" border="0" |
||
|- |
|- |
||
| + | ! Item |
||
| − | ! style="text-align:left;" |Item |
||
! style="width:150px" |Cost |
! style="width:150px" |Cost |
||
| − | ! |
+ | ! Boost |
|- |
|- |
||
| [[File:Tavern Supply Boost 1.png|75px]] |
| [[File:Tavern Supply Boost 1.png|75px]] |
||
| − | | |
+ | | {{RETS}} 250 |
| − | | |
+ | | Activate {{ISUP}}+20% supply boost for {{ITIM}}4h. |
|- |
|- |
||
| [[File:Tavern Supply Boost 2.png|75px]] |
| [[File:Tavern Supply Boost 2.png|75px]] |
||
| − | | |
+ | | {{RETS}} 1000 |
| − | | |
+ | | Activate {{ISUP}}+40% supply boost for {{ITIM}}12h. |
|- |
|- |
||
| [[File:Tavern Supply Boost 3.png|75px]] |
| [[File:Tavern Supply Boost 3.png|75px]] |
||
| − | | |
+ | | {{RETS}} 2500 |
| − | | |
+ | | Activate {{ISUP}}+60% supply boost for {{ITIM}}24h. |
|} |
|} |
||
Revision as of 21:33, 20 April 2020
The Supply Boost is a feature of some buildings and items to increase all supply collections from the city by certain percent. Supply boosts can also be activated from the Friends Tavern by paying for it with Tavern Silver.
Supply Boost Providers
Great Buildings
| Building | Boost | |
|---|---|---|
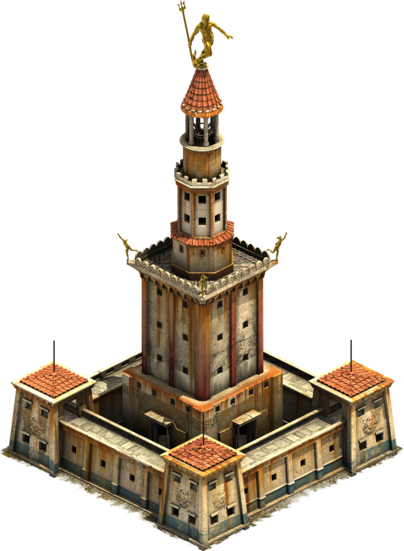
|
Lighthouse of Alexandria | Provides |

|
Royal Albert Hall | Provides |
Special Buildings
| Building | Boost | |
|---|---|---|

|
Candlemaker's Tent | Provides |

|
Classical Garden Statues | Provides from |

|
Elephant Fountain | Provides from |
|
Haunted Tower | Provides from |

|
Ornate Baths | Provides from |
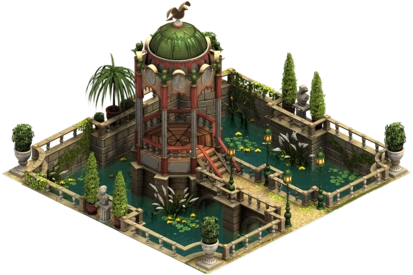
|
Pavilion | Provides from |

|
Shinto Temple (Level 2-9) |
Provides from |
|
The Trader Ship | Provides |

|
Trader Guard Post | Provides from |
Items
Supply boost items can be randomly gained from the boost crate and from various events. Items can only provide temporary supply boost.
| Item | Boost | |
|---|---|---|

|
Small Supply Boost | Provides Can also be found from rare incidents. |

|
Medium Supply Boost | Provides |

|
Large Supply Boost | Provides |
Friends Tavern
Temporary supply boost can be bought from the Friends Tavern for Tavern Silver.
| Item | Cost | Boost |
|---|---|---|

|
Activate | |

|
Activate | |

|
Activate |
Happiness
The happiness of the population also affects the supply boost of the city.
 Enthusiastic population provides +20% supply boost.
- Angry population provides -50% supply boost.